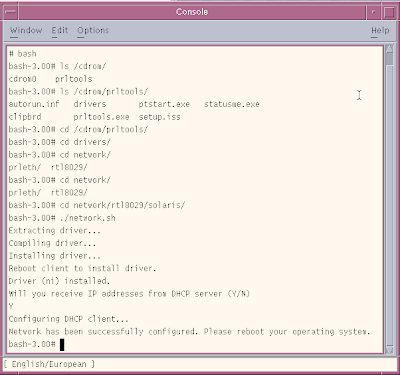
Now browse to Library / Parallels / Tools / vmtools.iso and click open. Then browse to /cdrom/prltools/drivers/network/solaris and run network.sh.

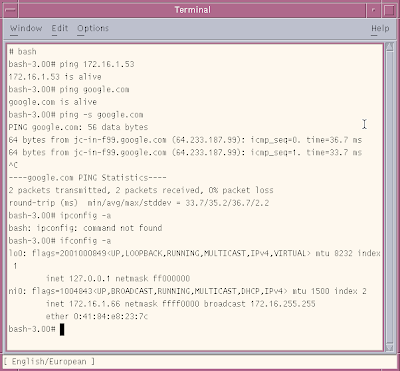
At this point, you should be able to ping your favorite website and confirm that you have been assigned an IP address.

NEXT:
Installing Solaris 10 on Mac Book: part 1
Installing Solaris 10 on Mac Book using Parallels: part 2
Installing Solaris 10 on Mac Book using Parallels: part 3
Installing Solaris 10 on Mac Book using Parallels: part 4
Installing Solaris 10 on Mac Book using Parallels: part 5
13 comments:
Thanks Farhan. Very handy guide (especially the last post about installing the network).
I avoided all the troubles you had with the CD-ROM not being ready by mounting the Solaris boot .iso image directly instead of writing it to a disk and trying to boot from that. The only thing to remember is to make sure to disconnect the CD-ROM from the image and go with the 'default' drive after the install is finished.
Thanks again.
That was very helpful. That one little detail of mounting the vm iso was what I was missing.
Thanks.
Thom
The small detail of mounting the vm iso to get the network card working was the ticket.
Thanks,
Thom
This is awesome Frank. I was thinking of doing the same thing since my Mac Mini is dying, and I'll need a portable solution in a couple months. This could save me a bunch of time.
(BTW, I didn't know you had this blog. The photo in the header makes you look like a baddass. You seem much nicer in the office.)
thanks a lot, mounting vmtools to get 8029 driver makes my day!
Great stuff. That last bit on networking was just the ticket to get me going.
Strange, though, the install screens looked nothing like what you have on the blog (graphically). Worked, though, just fine. Thanks!
Thanks for the quick help of getting networking working...a minor correction, the path to the network.sh script for solaris is:
/cdrom/prltools/drivers/network/rtl8029/solaris
at least on my version of parallels.
Thanks!
Whew! No joy for networking solaris inside of Parallels until I found your post. Much thanks.
I really appreciate the screen by screen network help.
Regrettably, I got up to the point where I mounted the .iso image and opened to the Solaris network RTL8029. I tried running the script, but it seemed to flash on the desktop and quit.
I am running Solaris 10 (5.10) in parallels 5584. I see that you had the Console window open, but I don't see how to open it on Solaris 10 (Desktop). Wanted to know if that was important to the process. (being in the Console window, that is)
THANKS!
MacBook Pro 2.33 Ghz- MacOS 10.4.8 - 2 GB RAM
Beautiful. I didn't find the networking info in either the docs or the online knowledgebase. Thanks for posting this; great help!
Again, many thanks for those instructions on getting the Realtek card to work. Awesome :)
Mind you, in order to mount the vmtools.iso image I had to manually mount it by using:
mkdir /mnt/cdrom
mount -F hsfs /dev/dsk/c0t1d0s0 /mnt/cdrom
For some reason autofs wasn't picking up on the attaching of the new .ISO and was still clinging onto the Sol10 .ISO. Weird.
Excellent installation guide. The detailed screen-by-screen + the network part in the end enabled me to successfully install Solaris on my MacBook even though I have no previous experience with Solaris. Good work :)
Post a Comment