Tomorrow I will be attending the Solaris 10 User Group Part X at the offices of Sun Microsystems, 101 Park Ave., New York, NY. This is an all day event and there is even a MySQL talk by Philip Antoniades. Other presenters include Ambreesh Khanna, Isaac Rozenfeld, Neal Weiss, Sunay Tripathi, Amjad Khan, Damien Farnham and Dave Teszler.
Unfortunately, the event registration is now closed, but if you're attending I look forward to meeting you.
Showing posts with label solaris 10. Show all posts
Showing posts with label solaris 10. Show all posts
Tuesday, May 06, 2008

Friday, May 02, 2008
MySQL / Linux swap problem doesn't exist on Solaris 10
Right now there is a discussion on Planet MySQL regarding MySQL / Linux swap problem. Peter Zaitsev originally brought the problem of MySQL swapping to light. Recently, Dathan Pattishall also wrote about it in his post Linux 64-bit, MySQL, Swap and Memory. Don McAskill followed up with his post, MySQL and the Linux Swap problem, and an interesting way to get around the issue: "make swap partitions out of RAM disks." Don also points to another article by Kevin regarding using O_DIRECT to fix the swap issue.
To get to the point, some time ago, I experienced a similar issue on few of my old servers running Solaris V210, UFS with plenty of memory available. My initial thinking was that I am experiencing similar issue so during my presentation at MySQL Conference, Optimizing MySQL and InnoDB on Solaris 10, I pointed that this *may* exist in Solaris 10. Luckily a Sun representative (I believe it was Matt Ingenthron) corrected me towards the end of my session and pointed that UFS and Solaris 10 kernel have features built to avoid just that. That confirmation from a Sun representative was authoritative. We have already decommissioned the affected servers from production so it may be some time before I can find the precise reason why we experienced the swapping issue. Note that I haven't seen this issue on any of our other V210, V440 and T5120s in production.
To get to the point, some time ago, I experienced a similar issue on few of my old servers running Solaris V210, UFS with plenty of memory available. My initial thinking was that I am experiencing similar issue so during my presentation at MySQL Conference, Optimizing MySQL and InnoDB on Solaris 10, I pointed that this *may* exist in Solaris 10. Luckily a Sun representative (I believe it was Matt Ingenthron) corrected me towards the end of my session and pointed that UFS and Solaris 10 kernel have features built to avoid just that. That confirmation from a Sun representative was authoritative. We have already decommissioned the affected servers from production so it may be some time before I can find the precise reason why we experienced the swapping issue. Note that I haven't seen this issue on any of our other V210, V440 and T5120s in production.
Wednesday, April 30, 2008
Optimizing MySQL and InnoDB on Solaris 10 for World's Largest Photo Blogging Community - Video
The video of one of my three sessions, "Optimizing MySQL and InnoDB on Solaris 10 for World's Largest Photo Blogging Community", presented at MySQL Conference & Expo 2008 has been uploaded by Sheeri. I am very thankful to her for doing all the hard work and making it available.
There are a few slides that were edited out of video because of reasons beyond my control. However, you should still be able to enjoy most of the video.
There is one point related to this video that I would like to make: Based on my particular experience I was leading to believe that Solaris 10 Kernel had the same issue as Linux Kernel related to swappiness and swapping where the kernel will start putting more importance on maintaining file system cache than the mysqld process. However, towards the end of the session, it was pointed out by a Sun engineer (thanks!) that there must be something else going on as UFS on Solaris 10 shouldn't depict this behavior and a process shouldn't swap in favor of maintaining file system cache. I am having this issue on 3 of my servers and I am currently working with Sun engineers to get to the bottom of the issue.
There are a few slides that were edited out of video because of reasons beyond my control. However, you should still be able to enjoy most of the video.
There is one point related to this video that I would like to make: Based on my particular experience I was leading to believe that Solaris 10 Kernel had the same issue as Linux Kernel related to swappiness and swapping where the kernel will start putting more importance on maintaining file system cache than the mysqld process. However, towards the end of the session, it was pointed out by a Sun engineer (thanks!) that there must be something else going on as UFS on Solaris 10 shouldn't depict this behavior and a process shouldn't swap in favor of maintaining file system cache. I am having this issue on 3 of my servers and I am currently working with Sun engineers to get to the bottom of the issue.
Sunday, April 27, 2008
Don McAskill - People I met at MySQL Conference
"The two metrics that are most important to me are first customer satisfaction and second growth." - Don McAskill
Today, I noticed Don is featured on Sun's customer success stories page:
Don McAskill is the CEO and Chief Geek of Smugmug, a photo and now hi-def video (using H.264) sharing site with a successful business model behind it.
I initially met Don last year at the MySQL Conference when my then boss told me that he is interested in meeting him. That was my introduction to Smugmug. I was impressed by SmugMug's presentation of photos and the care they took to make your photos and galleries look awesome.
This year, as a member of Smugmug, me and my wife got to interact with Don on a personal level.
We had several suggestions related to how our Smugmug experience could be improved and Don listened very carefully. One of the things I was most interested in seeing implemented was blocking Smugmug subdomains from being indexed if a customer is hosting them on their own subdomain.
I was truly impressed by how much Don thinks and cares about his members. It isn't a surprise that he runs a very successful site. From my conversations with Don, It seems there are many interesting projects Don and his team are working on and I can't wait to see them implemented. Almost all of the projects we heard about were focused towards customers. No wonder Smugmug has a high customer retention rate.
Technology wise, I am a fan of decisions Don has made to run Smugmug. He uses MySQL, S3, EC2 for processing and video conversion, Solaris 10 and Sun hardware.
Despite being the CEO, Don is the MySQL guy at Smugmug. His latest blog post, Death of MySQL read replication high exaggerated, was a good natured jab at discussion Brian Aker started with Arjen Lentz and me jumping in.
In the following video, Don Grantham interviews Don McAskill (yup, two Dons together) about Smugmug's relationship with Sun and the challenges of running a successful Web 2.0 business with more than 350,000 paying customers and more than 300,000,000 photos. As you can see in the video, customer satisfaction is more important than growth to Smugmug.
Since I joined Smugmug, several of my friends including Ronald Bradford have also joined. You can view my galleries by clicking on the image below and Ronald's photos from the MySQL conference by clicking on the image underneath:


If you use Smugmug as well, drop your Smugmug URL as a comment (of course, only if you want to share).
To stay up to date with exciting stuff happening at Smugmug checkout Don's blog.
Today, I noticed Don is featured on Sun's customer success stories page:
Don McAskill is the CEO and Chief Geek of Smugmug, a photo and now hi-def video (using H.264) sharing site with a successful business model behind it.
I initially met Don last year at the MySQL Conference when my then boss told me that he is interested in meeting him. That was my introduction to Smugmug. I was impressed by SmugMug's presentation of photos and the care they took to make your photos and galleries look awesome.
This year, as a member of Smugmug, me and my wife got to interact with Don on a personal level.
We had several suggestions related to how our Smugmug experience could be improved and Don listened very carefully. One of the things I was most interested in seeing implemented was blocking Smugmug subdomains from being indexed if a customer is hosting them on their own subdomain.
I was truly impressed by how much Don thinks and cares about his members. It isn't a surprise that he runs a very successful site. From my conversations with Don, It seems there are many interesting projects Don and his team are working on and I can't wait to see them implemented. Almost all of the projects we heard about were focused towards customers. No wonder Smugmug has a high customer retention rate.
Technology wise, I am a fan of decisions Don has made to run Smugmug. He uses MySQL, S3, EC2 for processing and video conversion, Solaris 10 and Sun hardware.
Despite being the CEO, Don is the MySQL guy at Smugmug. His latest blog post, Death of MySQL read replication high exaggerated, was a good natured jab at discussion Brian Aker started with Arjen Lentz and me jumping in.
In the following video, Don Grantham interviews Don McAskill (yup, two Dons together) about Smugmug's relationship with Sun and the challenges of running a successful Web 2.0 business with more than 350,000 paying customers and more than 300,000,000 photos. As you can see in the video, customer satisfaction is more important than growth to Smugmug.
Since I joined Smugmug, several of my friends including Ronald Bradford have also joined. You can view my galleries by clicking on the image below and Ronald's photos from the MySQL conference by clicking on the image underneath:
If you use Smugmug as well, drop your Smugmug URL as a comment (of course, only if you want to share).
To stay up to date with exciting stuff happening at Smugmug checkout Don's blog.
Thursday, April 24, 2008
MySQL on Solaris 10 -- Buffer Overflow and Security Bypass Vulnerabilities
So found some recently discovered buffer overflow and security bypass vulnerabilities when running MySQL on Solaris 10. According to FrSIRT, these vulnerabilities "could be exploited by attackers or malicious users to bypass security restrictions, gain knowledge of sensitive information, cause a denial of service, or execute arbitrary code." A final resolution for these vulnerabilities is pending completion according to their website.
Unfortunately, I do not have a FrSIRT account currently (need to get one ASAP) so I couldn't dig this vulnerability further. However, I am dying to learn more about this.
Unfortunately, I do not have a FrSIRT account currently (need to get one ASAP) so I couldn't dig this vulnerability further. However, I am dying to learn more about this.
Thursday, February 07, 2008
Scaling the third most active Social Network with MySQL/InnoDB/Solaris

Sun Microsystems has published a case study, Delivering quality service to eleven million users with MySQL, InnoDB,
and the Solaris 10 Operating System, on Fotolog, the third most active social network according to ComScore and 14th most trafficked site according to Alexa.
Challenges:
• Scale to support eleven* million members and more than 100** million page views a day
• Increase performance without increase in database hardware (significant cost savings)
Solution
• MySQL database software
• InnoDB transactional storage engine for MySQL
• Solaris™ 10 Operating System
• Sun V440 and V210
Results
• Support for four times as many users with no additional hardware
• Higher percentage of working dataset in the memory with efficient schemas
• Four times the number of concurrent threads without adding servers
• Anticipated ability to double current number of threads
I will be presenting an updated and much more juicier version of how we achieved such scalability level from database point of view at the MySQL Conference 2008. The talk is titled, Optimizing MySQL and InnoDB on Solaris 10 for World's Largest Photo Blogging Community. So if you needed a sign to attend the conference, well you got one now :)
Notes:
* Now, Fotolog is reaching 15 million members with same number of database servers.
** Now reaching 150 million plus page views a day
Tuesday, January 22, 2008
Speaking at MySQL Conference 2008

I have been meaning to blog about this for quite some time but time seems to be the most scarce resource in my life.
This year, I will be presenting three sessions at MySQL Conference:
Disaster Is Inevitable—Are You Prepared?
What’s the worst database disaster you expect to happen? Are you prepared? Does your architecture support quicker recovery or do you have recovery bottlenecks built throughout your architecture? What will happen if InnoDB crashed beyond repair or if you have a massive irrepairable data corruption? What can you do to better prepare for the disaster, when it does happen? Do you have data restoration tools and procedures in place in case you need to resort to extreme measures? Join us in this eye opening, heart-racing, real-life inspired presentation by Fotolog’s Director of Database Infrastructure, Farhan “Frank” Mashraqi” to find out answers to these questions and more.
Optimizing MySQL and InnoDB on Solaris 10 for World's Largest Photo Blogging Community
Fotolog is a top 19 Internet destination with more than 12 million members, 315 million photos and more than 3 billion page views a month. In just a few years Fotolog has become a social phenomenon in Europe and South America. Through modifications to its data architecture, Fotolog was able to serve four times the number of users using the same number of database servers. A non-conventional, hybrid presentation that conveys the importance of scalability, performance tuning and schema optimizations in a practical way.
The Power of Lucene
Lucene is a powerful, high-performance, full-featured text search engine library that is written entirely in Java and provides a technology suitable for all size applications requiring full-text search in heterogeneous environments.
In this presentation, learn how you can use Lucene with MySQL to offer powerful searching capabilities within your application. The presentation will cover installation, usage, optimization of Lucene, and how to interface a Ruby on Rails application with Lucene using a custom Java server. This session is highly recommended for those looking to add full-text cross-platform, database independent search capability to their application.
Registration is now open. See you all soon!
Wednesday, October 24, 2007
Scaling MySQL with Solaris 10: Webinar
On Wednesday, October 24, at 2 PM EST I will be presenting an Information Week webinar about scaling MySQL on Solaris 10. The webinar is free to attend and sponsored by Sun. The webinar will be followed by a Live QA session.
Register for the webinar
Representatives from both Sun and MySQL will be present to take your questions. Hope to see you there!
Update: The recording (with audio) of this webinar is now available on Information Week website. Please note that registration is still required. After registration you should be able to view the recording.
Register for the webinar
DESCRIPTION
Fotolog is the world's largest photo blogging social network, boasting more than 700,000 new photos per day and more than 3 billion page views a month. More than 11 million fotologgers communicate and connect through their photos on Fotolog. With the help of Solaris 10 and MySQL Enterprise, Fotolog has scaled to become a top 20 destination on the Internet according to Alexa.
In this TechWebcast, Sun Microsystem's partner Fotolog shows creative ways used to scale their Web 2.0 architecture and MySQL Enterprise with Solaris 10 advanced features. Unlike typical scalability presentations which focus on the entire stack, Fotolog will emphasize on the role that understanding one's application, operating system and storage engine can play in addressing scalability challenges.
Web 2.0 applications world-wide rely on Sun to deliver the right combination of product innovation and capability, coupled with market leading partner solutions like Fotolog and MySQL.
Representatives from both Sun and MySQL will be present to take your questions. Hope to see you there!
Update: The recording (with audio) of this webinar is now available on Information Week website. Please note that registration is still required. After registration you should be able to view the recording.
Tuesday, May 08, 2007
DTrace and MySQL - 1
With this post, I am starting another series of blog posts that will help you become familiar of DTrace. You can then apply that knowledge to find all the hidden performance goodies of MySQL on Solaris 10. Sounds good?
DTrace is one of those tools that the more you use it, the more you fall in love with it. To be fair, it is much more than a tool, in fact it has its own language, D.
With DTrace you can enable probes by either their name or their number. To see a list of probes available, run
To enable a basic probe named BEGIN with the id of 1, we can either use:
In addition, to enabling individual probes, we can also enable multiple probes simply be specifying them on the command line. For instance:
or
If you try to enable a probe that is not valid, you will get an error like this:
For a complete and in-depth coverage of DTrace, make sure you check out Solaris Dynamic Tracing Guide. For those looking to dive into examples right away, checkout the /usr/demo/dtrace directory on your Solaris machine.
to be continued...
DTrace is one of those tools that the more you use it, the more you fall in love with it. To be fair, it is much more than a tool, in fact it has its own language, D.
With DTrace you can enable probes by either their name or their number. To see a list of probes available, run
[root@db31:/] dtrace -l | more.
ID PROVIDER MODULE FUNCTION NAME
1 dtrace BEGIN
2 dtrace END
3 dtrace ERROR
4 syscall nosys entry
5 syscall nosys return
6 syscall rexit entry
7 syscall rexit return
8 syscall forkall entry
9 syscall forkall return
10 syscall read entry
11 syscall read return
12 syscall write entry
13 syscall write return
14 syscall open entry
15 syscall open return
16 syscall close entry
17 syscall close return
18 syscall wait entry
19 syscall wait return
20 syscall creat entry
21 syscall creat return
...
To enable a basic probe named BEGIN with the id of 1, we can either use:
or
[root@db31:/] dtrace -n BEGIN
dtrace: description 'BEGIN' matched 1 probe
CPU     ID                    FUNCTION:NAME
  1      1                           :BEGIN
^C
[root@db31:/] dtrace -i 1
dtrace: description '1' matched 1 probe
CPU     ID                    FUNCTION:NAME
  0      1                           :BEGIN
^C
In addition, to enabling individual probes, we can also enable multiple probes simply be specifying them on the command line. For instance:
[root@db31:/] dtrace -i 1 -i 2 -i 3
dtrace: description '1' matched 1 probe
dtrace: description '2' matched 1 probe
dtrace: description '3' matched 1 probe
CPU     ID                    FUNCTION:NAME
  0      1                           :BEGIN
^C
  0      2                             :END
or
[root@db31:/] dtrace -n BEGIN -n END -n ERROR
dtrace: description 'BEGIN' matched 1 probe
dtrace: description 'END' matched 1 probe
dtrace: description 'ERROR' matched 1 probe
CPU     ID                    FUNCTION:NAME
  1      1                           :BEGIN
^C
  0      2                             :END
If you try to enable a probe that is not valid, you will get an error like this:
[root@db31:/] dtrace -n BEGIN -n END -n ERRORS
dtrace: invalid probe specifier ERRORS: probe description :::ERRORS does not match any probes
For a complete and in-depth coverage of DTrace, make sure you check out Solaris Dynamic Tracing Guide. For those looking to dive into examples right away, checkout the /usr/demo/dtrace directory on your Solaris machine.
to be continued...
Monday, May 07, 2007
Solaris 10 Dual Boot Installation on a Laptop
Earlier, I blogged about how to install Solaris 10 on Mac book using Parallels. This post contains links to screen casts about installing Open Solaris on a laptop as dual boot.
For information on installing Solaris 10 as a virtual machine on Mac Book, see my earlier posts:
- Introduction
- Backing up disk
- Partitioning the disk
- Solaris Express Developer edition installation
- Installing Sun Studio 11
For information on installing Solaris 10 as a virtual machine on Mac Book, see my earlier posts:
Installing MySQL on Solaris 10 Virtual Machine: gcc and cc Compiler Option Differences
I left the last post in this series at the point of running make for the bitkeeper client. If you have been following the posts and tried to do that, you will be greeted with the following errors:
The first line shows the compiler options being used followed by a warning and an error. The reason we are getting this error is because cc options != gcc options. We have two solutions at hand at this point:
1. Use gcc (we installed it earlier)
2. Change the compiler options to use cc's compiler options instead of gcc.
Using gcc compiler
To use the gcc compiler instead of cc, do the following:
This will let you go past the first set of errors. make will now be stopping with the following errors.
These errors mean that you need to set LDFLAGS as follows
Now running make should produce no errors.
Using the cc compiler flags
To change the gcc compiler flags to cc compiler flags, edit the Makefile and replace the line that specifies the gcc options with a line using options recognized by cc. So, you would find the line:
and replace with
Regarding -Wno-parentheses, James Carlson of Sun Microsystems pointed out the following:
Now running make will produce
To get rid of the undefined symbols, you would need to link the right libraries.
Al Hopper of Logical Approach Inc, once gave me a very handy tip to find more about the "mysterious" undefined symbol. He suggested using something like (run for both /lib and /usr/lib):
which produces:
This will tell us that we need the "-lnsl". Similarly running a slightly modified version of the above, we can find out that we also need "-lsocket" specified in LDFLAGS.
The approach I mention above is a bit controversial so use it only if you know the issues it could drag you into. There are other ways to get the same information such as "man socket" and "man gethostbyname" that will do the job in most cases.
At this point, you should be able to run make without any issues.
to be continued.
bash-3.00# make
cc -O2 -Wall -Wno-parentheses    bkf.c   -o bkf
cc: Warning: option -2 passed to ld
cc: illegal option -Wall
make: *** [bkf] Error 1
The first line shows the compiler options being used followed by a warning and an error. The reason we are getting this error is because cc options != gcc options. We have two solutions at hand at this point:
1. Use gcc (we installed it earlier)
2. Change the compiler options to use cc's compiler options instead of gcc.
Using gcc compiler
To use the gcc compiler instead of cc, do the following:
bash-3.00# CC=`which gcc`
bash-3.00# export CC
bash-3.00# make
This will let you go past the first set of errors. make will now be stopping with the following errors.
bash-3.00# make
/usr/local/bin/gcc -O2 -Wall -Wno-parentheses    bkf.c   -o bkf
Undefined                       first referenced
symbol                             in file
gethostbyname                       /var/tmp//ccGSplTt.o
socket                              /var/tmp//ccGSplTt.o
connect                             /var/tmp//ccGSplTt.o
ld: fatal: Symbol referencing errors. No output written to bkf
collect2: ld returned 1 exit status
make: *** [bkf] Error 1
These errors mean that you need to set LDFLAGS as follows
export LDFLAGS="-lsocket -lnsl -lm"
Now running make should produce no errors.
bash-3.00# make
/usr/local/bin/gcc -O2 -Wall -Wno-parentheses  -lsocket -lnsl -lm  bkf.c   -o bkf
Using the cc compiler flags
To change the gcc compiler flags to cc compiler flags, edit the Makefile and replace the line that specifies the gcc options with a line using options recognized by cc. So, you would find the line:
CFLAGS=-O2 -Wall -Wno-parentheses
and replace with
CFLAGS=-xO2 -v
Regarding -Wno-parentheses, James Carlson of Sun Microsystems pointed out the following:
Gcc does have it documented in the 'info' files; you just have to look
under "-Wparenthesis" in the warning options.

For the equivalent outside of gcc, see lint's "-errchk=no%parenthesis"
option.  (Our tool chain doesn't get lint and cc confused.  ;-})
Now running make will produce
bash-3.00# make
cc -xO2 -v    bkf.c   -o bkf
"bkf.c", line 196: warning: Function has no return statement : clone
Undefined                       first referenced
symbol                             in file
gethostbyname                       bkf.o
socket                              bkf.o
connect                             bkf.o
ld: fatal: Symbol referencing errors. No output written to bkf
make: *** [bkf] Error 1
To get rid of the undefined symbols, you would need to link the right libraries.
Al Hopper of Logical Approach Inc, once gave me a very handy tip to find more about the "mysterious" undefined symbol. He suggested using something like (run for both /lib and /usr/lib):
for i in /lib/*.so
do
 /usr/ccs/bin/nm -Ag $i |grep -v UNDEF |grep gethostbyname
done
which produces:
/lib/libnsl.so: [2643]  |    110640|      89|FUNC |GLOB |0    |11     |gethostbyname
/lib/libnsl.so: [2683]  |    110202|     222|FUNC |GLOB |0    |11     |gethostbyname_r
/lib/libnsl.so: [3113]  |    128448|     174|FUNC |GLOB |0    |11     |_switch_gethostbyname_r
/lib/libnsl.so: [2841]  |    110108|      44|FUNC |GLOB |0    |11     |_uncached_gethostbyname_r
/lib/libresolv.so: [1585]       |     78996|      38|FUNC |GLOB |0    |11     |res_gethostbyname
/lib/libresolv.so: [1397]       |     79034|      41|FUNC |GLOB |0    |11     |res_gethostbyname2
/lib/libxnet.so: [79]   |         0|       0|FUNC |GLOB |0    |ABS    |gethostbyname
This will tell us that we need the "-lnsl". Similarly running a slightly modified version of the above, we can find out that we also need "-lsocket" specified in LDFLAGS.
The approach I mention above is a bit controversial so use it only if you know the issues it could drag you into. There are other ways to get the same information such as "man socket" and "man gethostbyname" that will do the job in most cases.
export LDFLAGS="-lsocket -lnsl -lm"
At this point, you should be able to run make without any issues.
bash-3.00# make
cc -lsocket -lnsl -lm  bkf.o   -o bkf
to be continued.
Sunday, May 06, 2007
Installing MySQL on Solaris 10 Virtual Machine: Other tools
Before we can install MySQL using bitkeeper, we need certain tools to be installed.
Download Bitkeeper Client
From Sunfreeware.com
- Install wget-1.10.2-sol10-x86-local .
- Install gcc-3.4.6-sol10-x86-local or libgcc-3.4.6-sol10-x86-local.gz
- Install libiconv-1.11-sol10-x86-local (required for gcc)
- Install openssl-0.9.8e-sol10-x86-local (required for wget)
- Install make-3.81-sol10-x86-local (required for bk-client)
After downloading the above packages, navigate to the directory and then run
Now you can install the packages one by one.
At this point, if running wget gives you "command not found", then make sure you have added /usr/local/bin to your PATH. The documentation will be installed in /usr/local/doc.
Now we can install bitkeeper client.
to be continued...
Download Bitkeeper Client
From Sunfreeware.com
- Install wget-1.10.2-sol10-x86-local .
- Install gcc-3.4.6-sol10-x86-local or libgcc-3.4.6-sol10-x86-local.gz
- Install libiconv-1.11-sol10-x86-local (required for gcc)
- Install openssl-0.9.8e-sol10-x86-local (required for wget)
- Install make-3.81-sol10-x86-local (required for bk-client)
After downloading the above packages, navigate to the directory and then run
gunzip *.gz
Now you can install the packages one by one.
pkgadd -d libiconv-1.11-sol10-x86-local
# this will install SMCliconv
pkgadd -d gcc-3.4.6-sol10-x86-local
# installs SMCgcc
pkgadd -d openssl-0.9.8e-sol10-x86-local
# installs SMCossl
pkgadd -d wget-1.10.2-sol10-x86-local
# installs SMCwget
pkgadd -d make-3.81-sol10-x86-local
# installs SMCmake
At this point, if running wget gives you "command not found", then make sure you have added /usr/local/bin to your PATH. The documentation will be installed in /usr/local/doc.
Now we can install bitkeeper client.
wget http://www.bitmover.com/bk-client2.0.shar
/bin/sh bk-client2.0.shar
cd bk-client2.0
make
to be continued...
Saturday, May 05, 2007
Free Solaris 10 OS and Sun Developer Tools, or Solaris Express, Developer Edition DVD
Since I have been writing these days about working with MySQL on Solaris 10 virtual machine on Mac Book, I thought why not blog about a very cool offer by Sun. As a part of their media kit program, you can get a free Solaris 10 DVD of your choice. The choices you have are:
1. Solaris 10 Operating System and Sun Developer Tools, or
2. Solaris Express, Developer Edition for x86 systems.
With one request, you can request as many as 9999 licenses. What a great way to market your product. For those who would be interested in installing Solaris 10 for your Mac, this is a good opportunity so you can have a copy of Solaris 10 on DVD.
This is a very cool and smart move by Sun. There are certainly lessons to be learned here for other open source companies like MySQL.
One thing I am wondering about is that whether MySQL is included in the Solaris Express, Developer edition. Probably not, but that goes on to show you a golden marketing opportunity for both companies. Companies that are already using Sun hardware and Solaris 10 will be much more inclined to become paying MySQL customers if MySQL and Sun work even more together to promote and optimize MySQL on Solaris. Solaris 10 is a great operating system and MySQL, a great database. I would actually recommend that both the management of Sun and MySQL read the book "Getting to Yes: Negotiating Agreement without giving in" by Roger Fisher. It really is a great book that teaches to focus on solving issues rather than taking positions. Taking both hard and soft positions to negotiations is never helpful.
Anyway, back to the free DVDs. According to the confirmation email from Sun, you can expect to get the DVD in 2-4 weeks. The email also included some helpful links about Solaris 10, which I have included below for reference.
Solaris Learning Centers:
http://sun.com/solaris/teachmesun.com/solaris/teachme
Solaris How to Guides:
http://sun.com/solaris/howtoguidessun.com/solaris/howtoguides
Solaris Training & Learning Services
http://sun.com/training/solarissun.com/training/solaris
Solaris Services & Support
http://sun.com/solaris/get_supportsun.com/solaris/get_support
1. Solaris 10 Operating System and Sun Developer Tools, or
2. Solaris Express, Developer Edition for x86 systems.
With one request, you can request as many as 9999 licenses. What a great way to market your product. For those who would be interested in installing Solaris 10 for your Mac, this is a good opportunity so you can have a copy of Solaris 10 on DVD.
This is a very cool and smart move by Sun. There are certainly lessons to be learned here for other open source companies like MySQL.
One thing I am wondering about is that whether MySQL is included in the Solaris Express, Developer edition. Probably not, but that goes on to show you a golden marketing opportunity for both companies. Companies that are already using Sun hardware and Solaris 10 will be much more inclined to become paying MySQL customers if MySQL and Sun work even more together to promote and optimize MySQL on Solaris. Solaris 10 is a great operating system and MySQL, a great database. I would actually recommend that both the management of Sun and MySQL read the book "Getting to Yes: Negotiating Agreement without giving in" by Roger Fisher. It really is a great book that teaches to focus on solving issues rather than taking positions. Taking both hard and soft positions to negotiations is never helpful.
Anyway, back to the free DVDs. According to the confirmation email from Sun, you can expect to get the DVD in 2-4 weeks. The email also included some helpful links about Solaris 10, which I have included below for reference.
Solaris Learning Centers:
http://sun.com/solaris/teachmesun.com/solaris/teachme
Solaris How to Guides:
http://sun.com/solaris/howtoguidessun.com/solaris/howtoguides
Solaris Training & Learning Services
http://sun.com/training/solarissun.com/training/solaris
Solaris Services & Support
http://sun.com/solaris/get_supportsun.com/solaris/get_support
Installing MySQL on Solaris 10 Virtual Machine
Now that I am happy with my Solaris 10 virtual machine running on my Mac Book, I can proceed with installing (compiling) MySQL on it. However as you can expect, the default Solaris 10 installation doesn't install cc compiler by default. We can confirm that if the following error message is displayed when running we run cc on Solaris 10 console:
What this means is that we need to install Sun Studio 11 from Sun site. Before downloading you need to be logged in. The download file studio11-sol-x86.tar.bz2 is about 332.6MB.
Once you have it installed, check the checksum and then proceed with decompressing the Sun Studio 11 bz2 file. Note I used the very verbose and keep option. You may or may not want to use them.
Among other files, it will put an InstallGuide_Solaris.pdf file which you should read before installing. On Solaris you can use gpdf to launch the file.
One thing to note when installing Sun Studio 11 is that you will need to set your PATH environment variable. By default the PATH variable will be set as following:
Since Sun Studio 11 will be installed in /opt/SUNWspro/bin we will need to add this to the PATH variable. To set the PATH variable, put the following line in your ~/.bashrc
Once the above has been placed, you will need to "dot" the file.
Now your PATH should be setup appropriately. Similarly you will need to setup MANPATH to include /opt/SUNWspro/man.
Once the Sun Studio will be installed, we will be able to access the documentation from /opt/SUNWspro/docs/index.html.
Before continuing, we should have ample swap space defined. You can add swap space by following the procedure below. On your Solaris 10 virtual machine, make sure you don't create the new swap file at / or you may get an error relating to no more space left on device. Since I created the virtual file system at /export/home through Parallels, I have prefixed my swap file location with /export/home.
When I tried to specify the new swap space, I got the following error. This is related to me setting a small swap size using Parallels. To correct this, I will need to set swap space higher through Parallels and then try again.
I tried again with 900M swap and it worked fine.
Now we can either run the installer in GUI or command-line mode. I haven't yet used the GUI installer to install Sun Studio 11 so I am going to do that just out of curiosity.
To launch the GUI installer, navigate to where you decompressed the Sunstudio11 files and run
To launch in command line mode:
Once the installer launches, click next to go to and accept the agreement. On the next screen make sure only English is selected. Keep the default selections selected for installation.
For the Sun Studio 11 software install directory, make sure it is /opt or you may need to modify your PATH and MANPATH variables accordingly.
Next you can review the installation and once you confirm the installation will begin.
Once the installation is complete, you will be able to see the log files created during install at
Some interesting information is available in /opt/SUNWspro/READMEs/email_template.txt.
At this point you should be able to run the IDE by executing
You should check to make sure that which cc doesn't return /usr/ucb/cc. If it does then do the following:
I will continue in the next post.
bash-3.00# cc
/usr/ucb/cc: language optional software package not installed
What this means is that we need to install Sun Studio 11 from Sun site. Before downloading you need to be logged in. The download file studio11-sol-x86.tar.bz2 is about 332.6MB.
Once you have it installed, check the checksum and then proceed with decompressing the Sun Studio 11 bz2 file. Note I used the very verbose and keep option. You may or may not want to use them.
bzip2 -d -v -v -k studio11-sol-x86.tar.bz2
time tar -xvf studio11-sol-x86.tar > studio11-install.log
# 4m53s
Among other files, it will put an InstallGuide_Solaris.pdf file which you should read before installing. On Solaris you can use gpdf to launch the file.
One thing to note when installing Sun Studio 11 is that you will need to set your PATH environment variable. By default the PATH variable will be set as following:
echo $PATH
/usr/sbin:/usr/bin:/usr/dt/bin:/usr/openwin/bin:/usr/ucb
Since Sun Studio 11 will be installed in /opt/SUNWspro/bin we will need to add this to the PATH variable. To set the PATH variable, put the following line in your ~/.bashrc
export PATH=$PATH:/opt/SUNWspro/bin
Once the above has been placed, you will need to "dot" the file.
. ~/.bashrc
Now your PATH should be setup appropriately. Similarly you will need to setup MANPATH to include /opt/SUNWspro/man.
Once the Sun Studio will be installed, we will be able to access the documentation from /opt/SUNWspro/docs/index.html.
Before continuing, we should have ample swap space defined. You can add swap space by following the procedure below. On your Solaris 10 virtual machine, make sure you don't create the new swap file at / or you may get an error relating to no more space left on device. Since I created the virtual file system at /export/home through Parallels, I have prefixed my swap file location with /export/home.
mkdir /export/home/swap
mkfile 2048m /export/home/swap/2gswap
ls -l /export/home/swap/2gswap
When I tried to specify the new swap space, I got the following error. This is related to me setting a small swap size using Parallels. To correct this, I will need to set swap space higher through Parallels and then try again.
swap -a /export/home/swap/2gswap
# size is invalid
I tried again with 900M swap and it worked fine.
Now we can either run the installer in GUI or command-line mode. I haven't yet used the GUI installer to install Sun Studio 11 so I am going to do that just out of curiosity.
To launch the GUI installer, navigate to where you decompressed the Sunstudio11 files and run
./installer
To launch in command line mode:
./installer -nodisplay
Once the installer launches, click next to go to and accept the agreement. On the next screen make sure only English is selected. Keep the default selections selected for installation.
For the Sun Studio 11 software install directory, make sure it is /opt or you may need to modify your PATH and MANPATH variables accordingly.
Next you can review the installation and once you confirm the installation will begin.
Once the installation is complete, you will be able to see the log files created during install at
cd /var/sadm/install/logs
Some interesting information is available in /opt/SUNWspro/READMEs/email_template.txt.
At this point you should be able to run the IDE by executing
sunstudio.
You should check to make sure that which cc doesn't return /usr/ucb/cc. If it does then do the following:
cd /usr/ucb
rm cc
ln -s /opt/SUNWspro/bin/cc cc
I will continue in the next post.
Installing Solaris 10 on Mac Book using Parallels (5): Installing RTL8029
Solaris 10 currently does not support the RTL8029 network driver to be emulated in virtual machines. In order for us to have RTL8029 support on a Solaris 10 virtual machine, we must install the RTL8029 network adapter driver. This driver can be configured manually or by running the network.sh script. When Solaris 10 virtual machine is running, we need to connect vmtools.iso to the CD/DVD ROM drive of Solaris 10 machine. To do this, go to Devices / CD/DVD ROM / Connect Image.
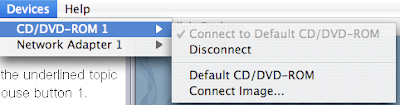
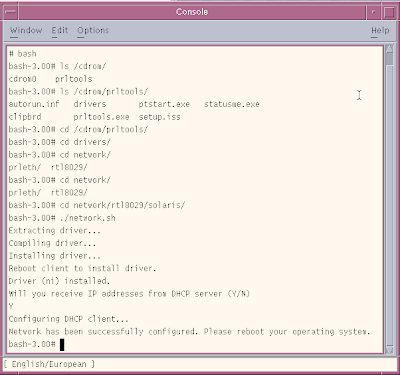
Now browse to Library / Parallels / Tools / vmtools.iso and click open. Then browse to /cdrom/prltools/drivers/network/solaris and run network.sh.
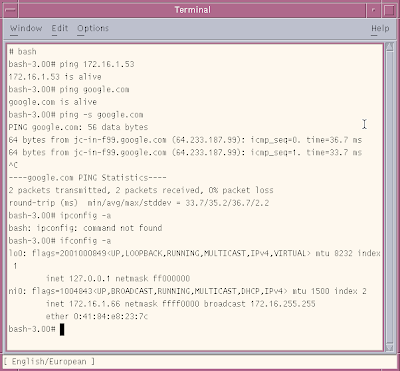
At this point, you should be able to ping your favorite website and confirm that you have been assigned an IP address.
NEXT:
Installing Solaris 10 on Mac Book: part 1
Installing Solaris 10 on Mac Book using Parallels: part 2
Installing Solaris 10 on Mac Book using Parallels: part 3
Installing Solaris 10 on Mac Book using Parallels: part 4
Installing Solaris 10 on Mac Book using Parallels: part 5

Now browse to Library / Parallels / Tools / vmtools.iso and click open. Then browse to /cdrom/prltools/drivers/network/solaris and run network.sh.

At this point, you should be able to ping your favorite website and confirm that you have been assigned an IP address.

NEXT:
Installing Solaris 10 on Mac Book: part 1
Installing Solaris 10 on Mac Book using Parallels: part 2
Installing Solaris 10 on Mac Book using Parallels: part 3
Installing Solaris 10 on Mac Book using Parallels: part 4
Installing Solaris 10 on Mac Book using Parallels: part 5
Installing Solaris 10 on Mac Book using Parallels (4)
Ok, so after the installation ended I got the dreaded "Solaris 10" Software Installation partially failed.

The detailed error messages were located in /tmp/install. Most errors were related to unallocated space in UFS something that may be explainable by the fact that it is an expanding file system and for a virtual machine. However most installations were successful so I decided to ignore the errors for now (after logging) and proceed.

Next was the confirmation screen for additional software which had installed successfully.

At this point you should be seeing a reboot screen like the one displayed below

Upon reboot, there were some errors related to scratch registers. I will investigate them later but for now, let's continue. These errors relate to the fact that we are running as a virtual machine.

At this point the virtual machine froze for a long time so I decided to stop and start the execution again. This time I got the "All devices are configured" message followed by a question about whether I would like to overwrite the system's default NFS version 4 domain name. I answered no.

Then Solaris started in GUI mode. At this point I can finally login.

When you login for the very first time, you will be presented with the option of choosing the default desktop.
 .
.
At this point, I will like to get the networking working (:)) as that has been an issue so far. I will continue from this point on in my next post.
NEXT:
Installing Solaris 10 on Mac Book: part 1
Installing Solaris 10 on Mac Book using Parallels: part 2
Installing Solaris 10 on Mac Book using Parallels: part 3
Installing Solaris 10 on Mac Book using Parallels: part 4
Installing Solaris 10 on Mac Book using Parallels: part 5

The detailed error messages were located in /tmp/install. Most errors were related to unallocated space in UFS something that may be explainable by the fact that it is an expanding file system and for a virtual machine. However most installations were successful so I decided to ignore the errors for now (after logging) and proceed.

Next was the confirmation screen for additional software which had installed successfully.

At this point you should be seeing a reboot screen like the one displayed below

Upon reboot, there were some errors related to scratch registers. I will investigate them later but for now, let's continue. These errors relate to the fact that we are running as a virtual machine.

At this point the virtual machine froze for a long time so I decided to stop and start the execution again. This time I got the "All devices are configured" message followed by a question about whether I would like to overwrite the system's default NFS version 4 domain name. I answered no.

Then Solaris started in GUI mode. At this point I can finally login.

When you login for the very first time, you will be presented with the option of choosing the default desktop.
 .
.At this point, I will like to get the networking working (:)) as that has been an issue so far. I will continue from this point on in my next post.
NEXT:
Installing Solaris 10 on Mac Book: part 1
Installing Solaris 10 on Mac Book using Parallels: part 2
Installing Solaris 10 on Mac Book using Parallels: part 3
Installing Solaris 10 on Mac Book using Parallels: part 4
Installing Solaris 10 on Mac Book using Parallels: part 5
Installing Solaris 10 on Mac Book using Parallels (3)
This is the third part of installing Solaris 10 on Mac book as a virtual machine using Parallels.
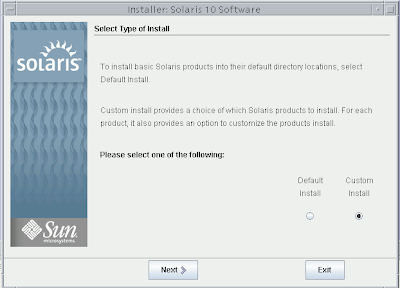
We left off at the "Type of Install" screen for which I am going to choose Custom Install.
Next, choose the software localizations. If you don't choose any localization, the default English version of Solaris will be installed.
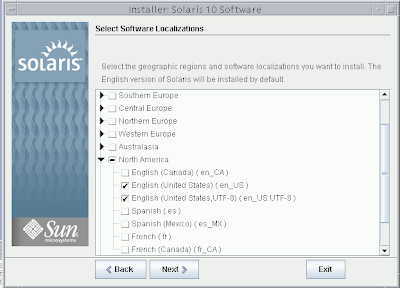
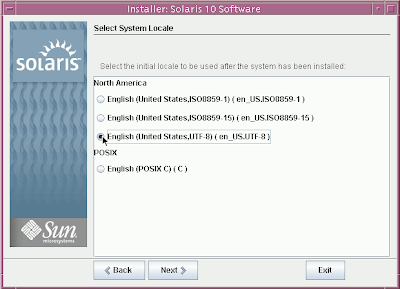
The default selection was English POSIX C (C). I chose the English US UTF-8 as the inital locale to be used after the system initializes.
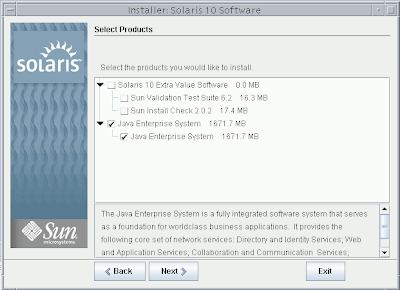
Depending on your preference, you may also want to install Java Enterprise System for development etc.
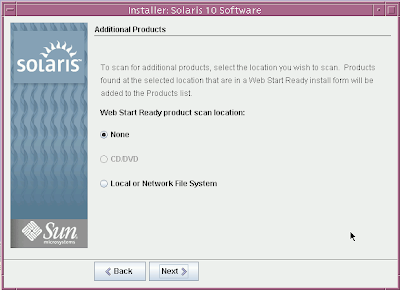
If you would like to scan for additional Solaris products and you have them on a local or network file system, you can do so in the next step.
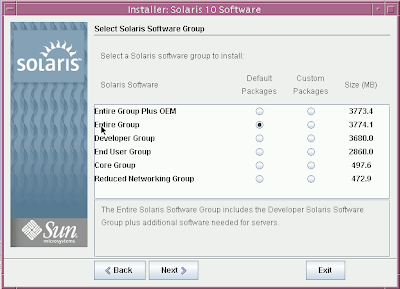
I will be installing the Entire Group. which will include the developer solaris software and additional software needed for servers.
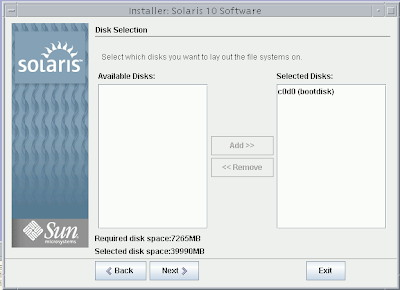
Next is the disk selection screen. The default configuration here is just fine.
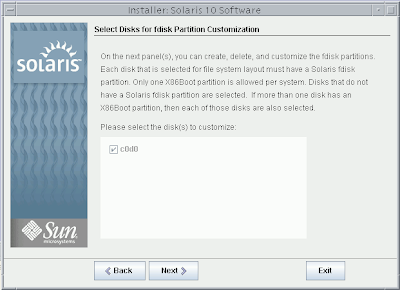
In the next screen you can select disk(s) for fdisk partitioning. Each disk selected for file system layout must have a Solaris fdisk partition. Each system can only have one X86Boot partition.
For the next screen, the default options are fine.
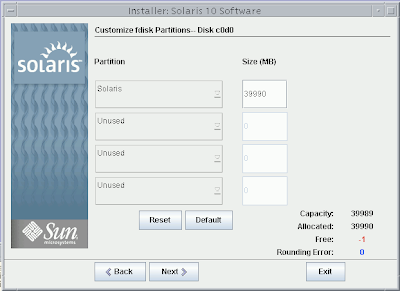
Now Solaris will determine size requirements based on your selections and then present information about Lay Out File Systems
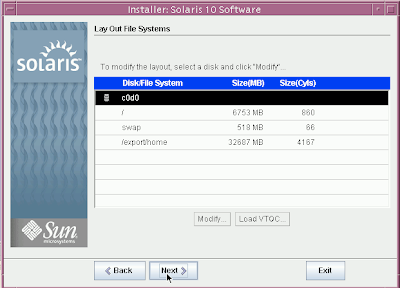
If everything looks good click next to confirm and install your selections.
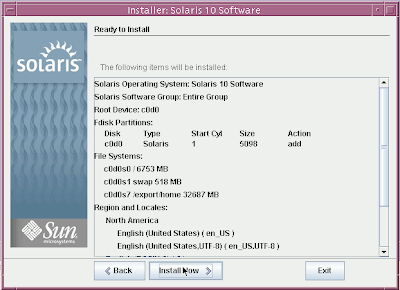
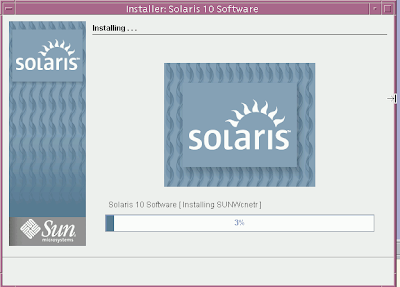
Now sit back and enjoy the installation as it proceeds.
To be continued...
NEXT:
Installing Solaris 10 on Mac Book: part 1
Installing Solaris 10 on Mac Book using Parallels: part 2
Installing Solaris 10 on Mac Book using Parallels: part 3
Installing Solaris 10 on Mac Book using Parallels: part 4
Installing Solaris 10 on Mac Book using Parallels: part 5
We left off at the "Type of Install" screen for which I am going to choose Custom Install.

Next, choose the software localizations. If you don't choose any localization, the default English version of Solaris will be installed.

The default selection was English POSIX C (C). I chose the English US UTF-8 as the inital locale to be used after the system initializes.

Depending on your preference, you may also want to install Java Enterprise System for development etc.

If you would like to scan for additional Solaris products and you have them on a local or network file system, you can do so in the next step.

I will be installing the Entire Group. which will include the developer solaris software and additional software needed for servers.

Next is the disk selection screen. The default configuration here is just fine.

In the next screen you can select disk(s) for fdisk partitioning. Each disk selected for file system layout must have a Solaris fdisk partition. Each system can only have one X86Boot partition.

For the next screen, the default options are fine.

Now Solaris will determine size requirements based on your selections and then present information about Lay Out File Systems

If everything looks good click next to confirm and install your selections.

Now sit back and enjoy the installation as it proceeds.

To be continued...
NEXT:
Installing Solaris 10 on Mac Book: part 1
Installing Solaris 10 on Mac Book using Parallels: part 2
Installing Solaris 10 on Mac Book using Parallels: part 3
Installing Solaris 10 on Mac Book using Parallels: part 4
Installing Solaris 10 on Mac Book using Parallels: part 5
Installing Solaris 10 on Mac Book using Parallels (2)
In my last post, I started a guide to install SOlaris 10 as a virtual machine on Mac book using Parallels. This is a continuation of that post.
After clicking finish, I was presented with the following screen for a moment:
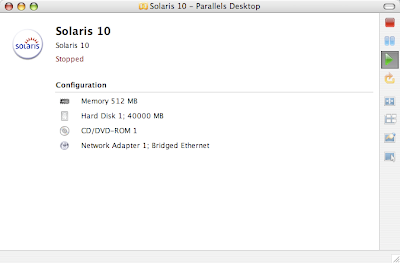
Then it started to make an attempt to boot, however since the DVD wasn't ready, the boot failed.
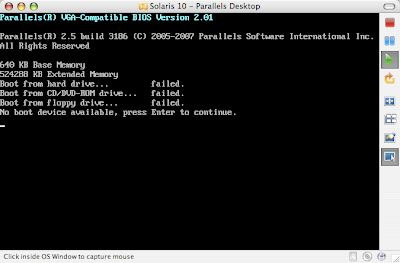
Before I know it, I was seeing the message presented in the following screen shot:
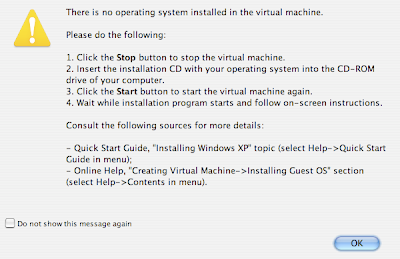
Don't worry if you see a similar message. All you gotta do is stop the virtual machine, make sure the Solaris 10 DVD is inserted and then click on the start button to start the virtual machine installation once again.
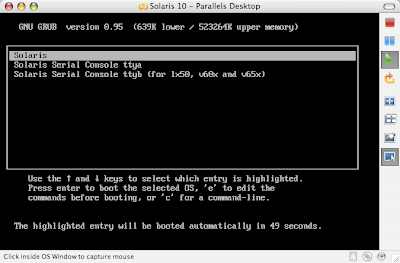
Soon you will be presented with the following options. Just make sure you select Solaris and hit Enter. If you still get errors about not being able to mount DVD ROM, just try again :)
Next, choose the type of installation. I chose Solaris Interactive.
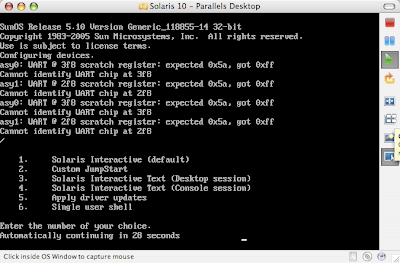
At this point, you will see messages regarding
If you experience that you are stuck at "Searching for configuration file(s)" for a very long time, try stopping and restarting virtual machine installation.
Next you will be presented with "Proposed Window System Configuration for Installation"
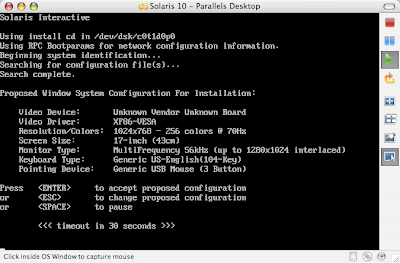
I wanted to decrease the resolution as with the default resolution in my earlier installation attempts, I wasn't able to run Solaris 10 in full screen mode. If you press ESC, you can change the defaults using kdmconfig.
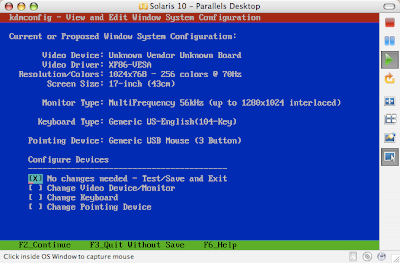
Keep going through the screens by pressing [fn + F2] until you get to the kdmconfig screen that asks you to specify screen size selection. I chose 13-inch since I have a 13-inch Mac book. The default selected for me was 17-inch.
Clicking next will bring you to "Resolution/Colors Selection." Based on the issues I had with earlier installs, this is what I was looking for. The default selection was 1024x768-256 colors @70 Hz.
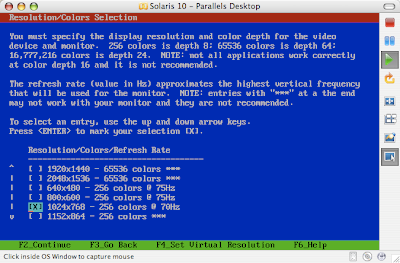
I chose 800x600 - 256 colors at 75Hz.
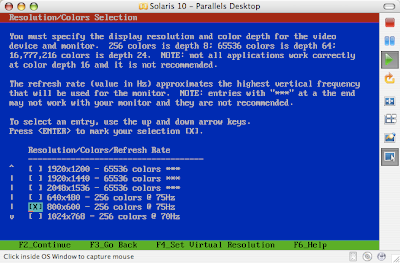
My final configuration looked something like:
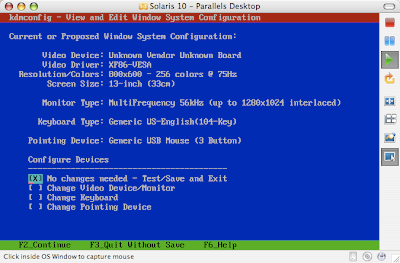
Next, we are ready to now run the kdmconfig Window System Configuration test.
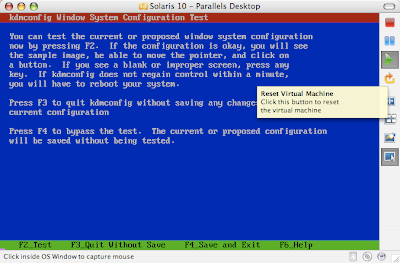
Run the test by pressing F2 (fn+F2) and you should see something like the following:
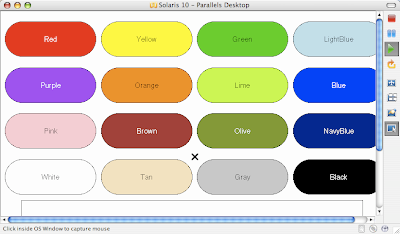
Seeing the test results, I went back and changed from 256 colors to 65536 colors. After running the test successfully for the new resolution, I was presented with the language choice screen.
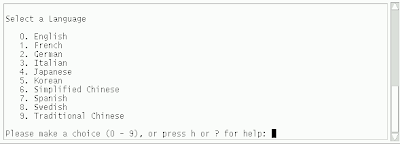
Once you select the language, you will see the following screen for some time.
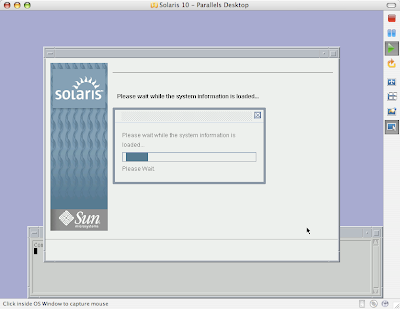
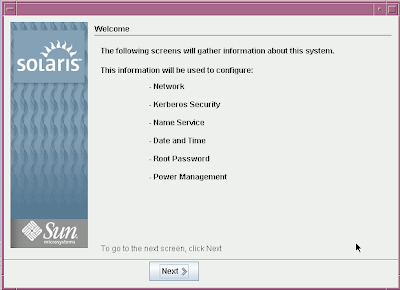
Now we are ready to give Solaris 10 virtual machine information regarding the system.
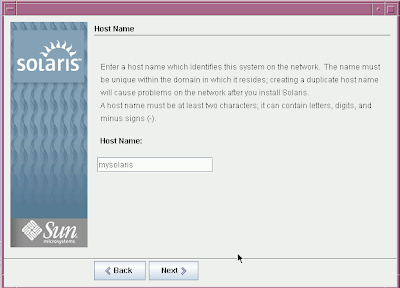
Go ahead and specify the hostname for your virtual machine.
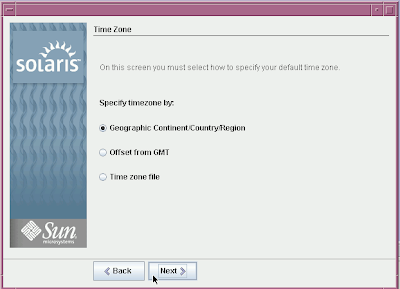
After specifying the hostname, we need to specify the time zone.
Specify the root password on the next screen:
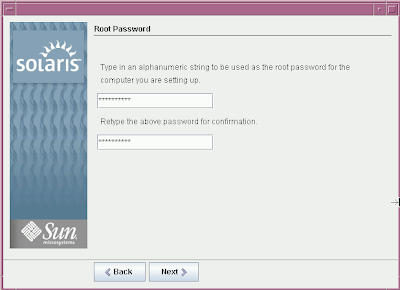
At this point it is important to note that Solaris 10 only cares about the first 8 characters of your password. After those 8 characters you can specify whatever gibrish you want and it will authenticate successfully. I know it's very bizarre and questionable behavior of Soalris in a world where protecting sensitive information is extremely important.
Next, you will see the selection summary. Click on confirm to continue with Solaris Installation.
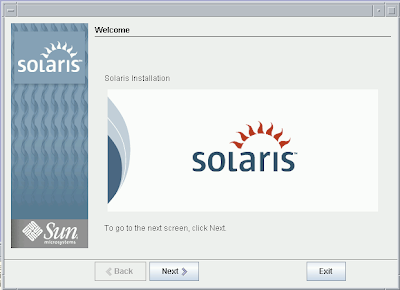
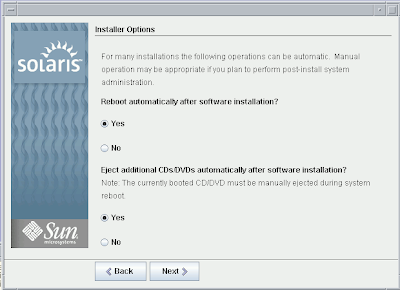
The default Installer options displayed in the next step are fine.
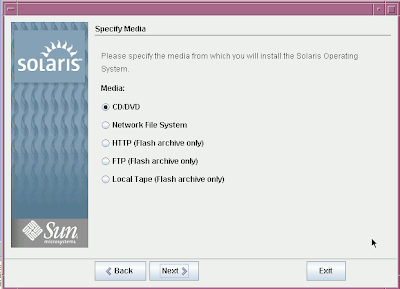
Specify the media from which you intend to install Solaris 10 Operating System. For our purpose, the default (CD/DVD) is fine.
Now the system initialization begins. In a moment you will be asked to accept the agreement to continue installation.
Next choose Default install if you want to install basic Solaris products and tools in their default location. I am however, going to choose Custom install.
To be continued in my next blog post.
NEXT:
Installing Solaris 10 on Mac Book: part 1
Installing Solaris 10 on Mac Book using Parallels: part 2
Installing Solaris 10 on Mac Book using Parallels: part 3
Installing Solaris 10 on Mac Book using Parallels: part 4
Installing Solaris 10 on Mac Book using Parallels: part 5
After clicking finish, I was presented with the following screen for a moment:

Then it started to make an attempt to boot, however since the DVD wasn't ready, the boot failed.

Before I know it, I was seeing the message presented in the following screen shot:

Don't worry if you see a similar message. All you gotta do is stop the virtual machine, make sure the Solaris 10 DVD is inserted and then click on the start button to start the virtual machine installation once again.
Soon you will be presented with the following options. Just make sure you select Solaris and hit Enter. If you still get errors about not being able to mount DVD ROM, just try again :)

Next, choose the type of installation. I chose Solaris Interactive.

At this point, you will see messages regarding
"Using install cd in /dev/dsk/c0t1d0p0
Using RPC Bootparams for network configuration information
Beginning System identification
Searching for configuration file(s)...
Search complete"
If you experience that you are stuck at "Searching for configuration file(s)" for a very long time, try stopping and restarting virtual machine installation.
Next you will be presented with "Proposed Window System Configuration for Installation"

I wanted to decrease the resolution as with the default resolution in my earlier installation attempts, I wasn't able to run Solaris 10 in full screen mode. If you press ESC, you can change the defaults using kdmconfig.

Keep going through the screens by pressing [fn + F2] until you get to the kdmconfig screen that asks you to specify screen size selection. I chose 13-inch since I have a 13-inch Mac book. The default selected for me was 17-inch.
Clicking next will bring you to "Resolution/Colors Selection." Based on the issues I had with earlier installs, this is what I was looking for. The default selection was 1024x768-256 colors @70 Hz.

I chose 800x600 - 256 colors at 75Hz.

My final configuration looked something like:

Next, we are ready to now run the kdmconfig Window System Configuration test.

Run the test by pressing F2 (fn+F2) and you should see something like the following:

Seeing the test results, I went back and changed from 256 colors to 65536 colors. After running the test successfully for the new resolution, I was presented with the language choice screen.

Once you select the language, you will see the following screen for some time.

Now we are ready to give Solaris 10 virtual machine information regarding the system.

Go ahead and specify the hostname for your virtual machine.

After specifying the hostname, we need to specify the time zone.

Specify the root password on the next screen:

At this point it is important to note that Solaris 10 only cares about the first 8 characters of your password. After those 8 characters you can specify whatever gibrish you want and it will authenticate successfully. I know it's very bizarre and questionable behavior of Soalris in a world where protecting sensitive information is extremely important.
Next, you will see the selection summary. Click on confirm to continue with Solaris Installation.

The default Installer options displayed in the next step are fine.

Specify the media from which you intend to install Solaris 10 Operating System. For our purpose, the default (CD/DVD) is fine.

Now the system initialization begins. In a moment you will be asked to accept the agreement to continue installation.
Next choose Default install if you want to install basic Solaris products and tools in their default location. I am however, going to choose Custom install.
To be continued in my next blog post.
NEXT:
Installing Solaris 10 on Mac Book: part 1
Installing Solaris 10 on Mac Book using Parallels: part 2
Installing Solaris 10 on Mac Book using Parallels: part 3
Installing Solaris 10 on Mac Book using Parallels: part 4
Installing Solaris 10 on Mac Book using Parallels: part 5
Installing Solaris 10 on Mac Book using Parallels
Yesterday, I got myself a Mac Book with 2GB of RAM and I am very excited about it. Earlier I created a Microsoft Windows XP virtual machine using Parallels. The whole process was a breeze. While going through Parallels documentation that it partially supports Solaris 10 as well. I had a DVD with Solaris 10 6/06 handy (which folks at Sun gave me when I visited them around two months ago in New York) so I thought why not try it out as if it works, I would have my dream machine ready. My work is 100% Solaris 10 shop as far as my professional duties are concerned. However, I didn't want to buy a Solaris 10 laptop due to lack of support available.
One cool thing about Parallels is that it lets you choose between "Shared Networking" and "Bridged Networking". Shared Networking is ideal if you don't want your virtual machine to have its own IP. This way your virtual machine will not be visible on the network.
Overall, creating virtual machine for Solaris 10 was not hard at all. However, I did run into networking issues that I couldn't solve even through command line or through smc. It turns out that in order for Solaris 10 to have networking support, you need to have Parallels networking tools installed. Since my work on this Mac Book is going to mostly revolve around MySQL, I need networking setup for Solaris. Another troubling issue I encountered was trying to run Solaris 10 in full screen mode as Solaris cannot the support the 1280x800 resolution.
Step 1: Launch Parallels for Mac
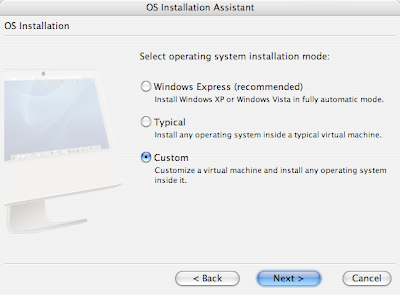
If you want to create a new Solaris 10 Virtual Machine then click "New" after launching Parallels desktop to launch OS Installation Assistant. Once the assistant launches, choose "Custom" and click next.
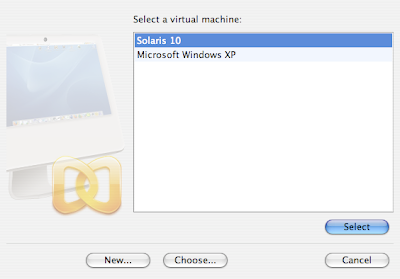
If you are wanting to reset your existing Solaris 10 Virtual machine for whatever reason, you can select the virtual machine you would like to operate on and then under the File menu, click on delete to launch an assistant program.
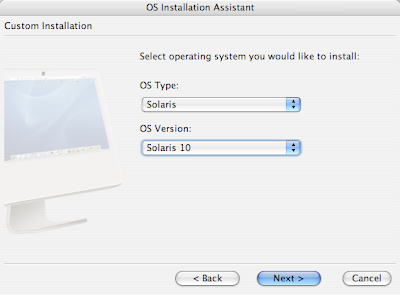
In the next step, select the OS Type as Solaris and OS Version Solaris 10 and click next.
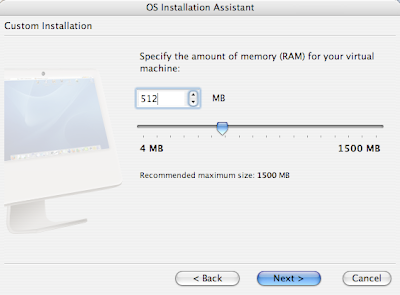
Next, you will be asked to specify the amount of RAM for your virtual machine. The default selection would be 256MB. It is highly recommended that you choose a value larger than 400MB because otherwise you will not be able to run the GUI for Solaris. Since I need to run Chime, a dtrace tool, I chose 512MB.
Once you have specified the amount of RAM to use for Solaris 10, click next to select virtual hard disk option. Since we are creating a new virtual machine, select "Create a new hard disk image."
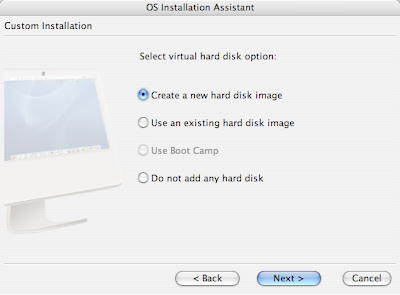
After clicking next, we need to specify the size of the virtual hard disk. It is recommended that you leave the default 32GB and select Expanding format for the virtual hard disk. If you are installing Solaris 10 with typical options, this is the format that will be selected by default.
The benefit of selecting Expanding format is that the size of the virtual hard disk will be 0 when created. The size grows up to the max specified size. Since the space is allocated on demand, you get hard drive space saving.
Clicking next will ask you to select a networking option for the Solaris 10 virtual machine. The default "Shared Networking" will let our Virtual Solaris 10 machine use Mac's network connections. Based on my earlier experiences with Solaris 10, I encourage you to select "Bridged Ethernet" which will make our Solaris 10 virtual machine appear as a separate machine on the Internet.
On the next screen keep the "Default Adapter" selected for the real network interface to be used by Solaris 10 virtual machine.
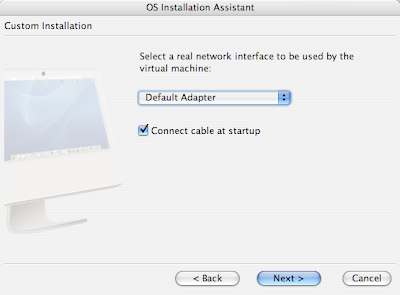
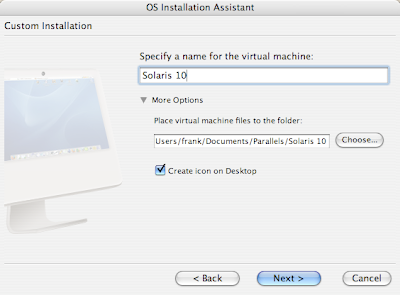
Now we are ready to name our Solaris 10 virtual machine on the next screen.
Believe it or not, we are actually ready to start the installation. Since I am installing the virtual machine using a real DVD and not from an ISO image, I kept the default options selected. Make sure you have inserted the Solaris 10 DVD/CD at this point before continuing.
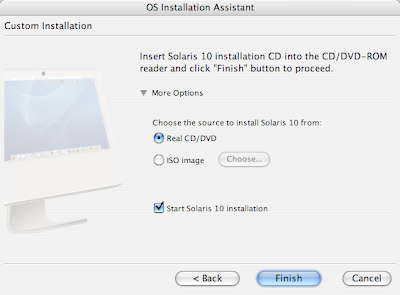
Clicking finish at this point will launch the Solaris 10 installation process. I will continue from this point in my next blog post.
NEXT:
Installing Solaris 10 on Mac Book: part 1
Installing Solaris 10 on Mac Book using Parallels: part 2
Installing Solaris 10 on Mac Book using Parallels: part 3
Installing Solaris 10 on Mac Book using Parallels: part 4
Installing Solaris 10 on Mac Book using Parallels: part 5
One cool thing about Parallels is that it lets you choose between "Shared Networking" and "Bridged Networking". Shared Networking is ideal if you don't want your virtual machine to have its own IP. This way your virtual machine will not be visible on the network.
Overall, creating virtual machine for Solaris 10 was not hard at all. However, I did run into networking issues that I couldn't solve even through command line or through smc. It turns out that in order for Solaris 10 to have networking support, you need to have Parallels networking tools installed. Since my work on this Mac Book is going to mostly revolve around MySQL, I need networking setup for Solaris. Another troubling issue I encountered was trying to run Solaris 10 in full screen mode as Solaris cannot the support the 1280x800 resolution.
Step 1: Launch Parallels for Mac
If you want to create a new Solaris 10 Virtual Machine then click "New" after launching Parallels desktop to launch OS Installation Assistant. Once the assistant launches, choose "Custom" and click next.

If you are wanting to reset your existing Solaris 10 Virtual machine for whatever reason, you can select the virtual machine you would like to operate on and then under the File menu, click on delete to launch an assistant program.

In the next step, select the OS Type as Solaris and OS Version Solaris 10 and click next.

Next, you will be asked to specify the amount of RAM for your virtual machine. The default selection would be 256MB. It is highly recommended that you choose a value larger than 400MB because otherwise you will not be able to run the GUI for Solaris. Since I need to run Chime, a dtrace tool, I chose 512MB.

Once you have specified the amount of RAM to use for Solaris 10, click next to select virtual hard disk option. Since we are creating a new virtual machine, select "Create a new hard disk image."

After clicking next, we need to specify the size of the virtual hard disk. It is recommended that you leave the default 32GB and select Expanding format for the virtual hard disk. If you are installing Solaris 10 with typical options, this is the format that will be selected by default.
The benefit of selecting Expanding format is that the size of the virtual hard disk will be 0 when created. The size grows up to the max specified size. Since the space is allocated on demand, you get hard drive space saving.
Clicking next will ask you to select a networking option for the Solaris 10 virtual machine. The default "Shared Networking" will let our Virtual Solaris 10 machine use Mac's network connections. Based on my earlier experiences with Solaris 10, I encourage you to select "Bridged Ethernet" which will make our Solaris 10 virtual machine appear as a separate machine on the Internet.
On the next screen keep the "Default Adapter" selected for the real network interface to be used by Solaris 10 virtual machine.

Now we are ready to name our Solaris 10 virtual machine on the next screen.

Believe it or not, we are actually ready to start the installation. Since I am installing the virtual machine using a real DVD and not from an ISO image, I kept the default options selected. Make sure you have inserted the Solaris 10 DVD/CD at this point before continuing.

Clicking finish at this point will launch the Solaris 10 installation process. I will continue from this point in my next blog post.
NEXT:
Installing Solaris 10 on Mac Book: part 1
Installing Solaris 10 on Mac Book using Parallels: part 2
Installing Solaris 10 on Mac Book using Parallels: part 3
Installing Solaris 10 on Mac Book using Parallels: part 4
Installing Solaris 10 on Mac Book using Parallels: part 5
Subscribe to:
Posts (Atom)