My colleague in a company offsite mentioned Vidoop which lets you have password that cannot be stolen via key loggers and someone looking over your head. Apparently, you select your password as photo categories (e.g. animal,person, boat). Then when you login you are shown random photos and with random letters associated with them. Your task is to type in the letter that's shown on photos within your chosen photo categories. So on one login, your password may be "ABP", and second time you may have to type "BAG." What makes me not put trust in them is their revenue sharing programs with the websites that implement this technology.
BTW, does anyone know if they use MySQL?
Saturday, May 26, 2007
Thursday, May 24, 2007
my first link from a .gov site
It's pretty cool to see link to your blog posted on a .gov domain :)
frankmash.blogspot.com is another one of my blogs where I post sometimes.
frankmash.blogspot.com is another one of my blogs where I post sometimes.
Wednesday, May 23, 2007
Technocation presents MySQL conference videos and presentations
Sheeri, a good friend of mine has been working very hard to record, process and then publish hours and hours of MySQL conference videos. She has published the recordings on Technocation.
One request that I wanted to make to everyone is that if you download videos or presentations from Technocation, please consider giving a little back in form of a donation. All that goes in Technocation is ultimately for the benefit of the community. And remember, every little bit counts.
One request that I wanted to make to everyone is that if you download videos or presentations from Technocation, please consider giving a little back in form of a donation. All that goes in Technocation is ultimately for the benefit of the community. And remember, every little bit counts.
Five years of Fotolog
Today is Fotolog's 5th birthday. For a quick history of Fotolog, see John Borthwick (CEO) and Adam Seifer's (co-founder) posts.
Monday, May 21, 2007
Fotolog on the rise
I know Alexa is very controversial and we don't like to compare with Flickr, but...

Blue: Fotolog
Red: Flickr
Green: Bebo
We reached 8 million members recently (7 weeks from 7 million) and are currently ranked 18th on Alexa (yeah, I know it jumps around :)).
I added bebo because rumor is that Yahoo! wants to grab it for a cool billion.

Blue: Fotolog
Red: Flickr
Green: Bebo
We reached 8 million members recently (7 weeks from 7 million) and are currently ranked 18th on Alexa (yeah, I know it jumps around :)).
I added bebo because rumor is that Yahoo! wants to grab it for a cool billion.
Saturday, May 19, 2007
Negative number of threads connected?
Today, I noticed that one of my machines was giving a negative number for threads connected.
Anyone care to share why the threads would be displayed as a negative number in mysqladmin ex output:
Anyone care to share why the threads would be displayed as a negative number in mysqladmin ex output:
| Aborted_connects           | 0          |
| Connections                | 186        |
| Max_used_connections       | 0          |
| Threads_connected          | -31        |
| Aborted_connects           | 0          |
Tuesday, May 15, 2007
Storage: SATA Beast
Recently I have seen storage companies being evaluated at various occasions. I have talked to various vendors and their customers to get an idea of experiences, frustrations and most importantly, sustained performance. At this month's New York MySQL Meetup Marc Simony brought up something I hadn't heard of: SATA Beast. On a quick glance it seems it has some impressive features at what seems to be an amazingly low cost.
Update: To clarify, SATA Beast was of interest to me for storage solutions where sequential IO is needed, vs. random IO that is generated by databases such as MySQL. I was working on finding storage solution for our media, not databases. Using something like SATA Beast for our non-db storage will allow us to use 3Par solely for database purposes, the IO of which can then be further optimized.
Thank you, Jeremy, for reminding me to clarify this important distinction.
Frank
Speeding up replication
Since my last post I have been working on Pre-fetching relay binlogs to speed up MySQL replication. While I will be writing more and eventually posting my script, I wanted to mention that I am extremely satisfied with the results I am seeing. Very soon I will be posting a before and after graph so stay tuned.
Saturday, May 12, 2007
Pre-fetch binlogs to speed up MySQL replication
Note: this "script" is a one liner really and not something meant for general purpose use. It is very specific to my environment so I take no responsibility of any kind. It is very raw so use at YOUR OWN risk.
Last year at the MySQL camp, I heard about Paul Tuckfield's script that pre-fetches relay logs to speed up replication. Since then I got really interested in implementing it but never got the time. This year at MySQL conference Paul's script got a lot of attention again. Since it hasn't been released and I really need to start testing this on my test server. So I started hacking on creating a shell script to dig deeper into what's involved. Once I have that I may work on porting it to other languages.
To make the process of writing this script easier for others in their favorite languages I thought I will go through what's involved in creating this script on my blog. That way when you would like to write an open-source :) port of this script, you won't have to dig through everything. I will, of course, love to get feedback specially since I know so many people are interested in it.
Paul's keynote was among the best keynotes of MySQL conference. It was so popular that even after the keynote finished, people didn't stop picking Paul's mind. The "always-looking-out-for-the-community", Jay Pipes quickly offered , I must mention that Paul was very generous in answering many questions at both the MySQL Camp and MySQL Conference and Expo.
So the concept is something like this (unless otherwise specified, I will be talking about MySQL slave and not the master since we want to speed up the slave):
- Get the current position from where the slave is currently reading binlogs. This will give us the position we need to pass to mysqlbinlog program.
- If the slave isn't replicating all databases from the master then we need to filter those databases out when reading binlog output.
- Decide the maximum amount of data we would request mysqlbinlog to read at a time. Depending on the options passed to mysqlbinlog we can request whether the reading should stop at the end of current log file or should it continue till the end.
- As we get output from mysqlbinlog, we will need to extract the UPDATE statements.
- Once the UPDATE statements have been extracted we need to get the information contained in the WHERE clause and create a SELECT statement from it.
- These SELECT statements can then be played in advance to help speed up the UPDATE processes.
One thing to note is that if you use UPDATE LOW PRIORITY ... on your master then beware that it can further increase the slave lag.
One question I have in mind is whether a slave with query cache turned off will be able to realize the same performance benefits as a slave that has query cache turned on.
Another thing I am working on determining is some kind of formula that will help optimize how much data in advance should be read. This will all become reality soon.
Finally, I would like to measure key performance indicators before and after implementing this script. Ideas are certainly welcome regarding this.
If you have had a chance to play with mysqlbinlog you probably already know that most of the work is already done, thanks to the wealth of options that are available.
Of course, not everyone who will read this blog post will know about mysqlbinlog. So, I am going to give a brief introduction.
Moving relay logs to a test environment
To start playing with mysqlbinlog command, move some relay logs to your test machine.
Say hello to mysqlbinlog
Imagine if we would have had to read the binlogs ourself. Suddenly this whole script would become very challenging for some. Luckily we don't have to do that. Within the bin directory of your MySQL installation there are several helpful programs (or utilities) that you can use to ease your everyday life as in this case.
To view the mysqlbinlog options, run it without any option. I am going to touch on some of these options below.
First, let's start with invoking mysqlbinlog with the name of a relay log file that we are interested in reading.
Typical output of the above will be something similar to the following:
Let's de-construct this line by line:
This means that the following statement is at delimiter position 4.
First, we can see the date and time followed by server id to which the statement originally belonged.
The number following log_pos corresponds to the position of this relay log record in the original binlog.
Next is the type of statement, the thread id that caused this statement to be inserted. It seems like the next is probably time it took to execute the query and the error code generated when the query was executed..
The remaining lines are pretty self explanatory and contain the database name, original timestamp and the actual query.
As you can see there is a bunch of output that, while helpful, won't be needed for the purpose of creating this script. We can use the -s or --short-form option to obtain just the queries. Try it out:
Most of my slaves are not exact replicas of the master and do not "replicate" all databases. Some databases present on the master are ignored. Generally, when this is the case you would be using the --binlog-ignore-db=db_being_ignored on your master to ignore statements that belong to db_being_ignored don't make it to the binlog. But let's assume that for some reason your relay logs contain statements belonging to databases that aren't being replicated and should be ignored for the purpose of this script. If these statements aren't filtered out, you will end up issuing SELECTs that cannot be executed due to missing database and tables.
To get the queries for a specific database only we could use an external utility such as grep or sed, but not use -d or --database=name option and let mysqlbinlog do the job for us. In these posts I am going to just focus on creating this script for a single database. Later, if time permits, I will work on multiple databases. Our "script-in-progress" now becomes:
This will make mysqlbinlog output only entries that belong to db_being_ignored.
Unfortunately, I couldn't find any built-in filter to filter out UPDATE statements, therefore I am going to resort to some external utility like grep. Actually, let's use sed :)
The -e option specifies that we will be issuing edit command. As you can see multiple -e options can be specified. The /b flag is used for specifying patterns we want to keep and d to delete the pattern space.
I couldn't find the case-insensitive option for sed on Solaris 10 so let's try this (I'll improve it later):
Now let's bite the bullet and convert the UPDATE statements to SELECT statements.
OMG!, this is looking pretty good :)
Before we go any further, let's specify exactly how much of relay binlog should be read.
We have at least two options as far the decision of where to start and stop.
First, we can specify --start-position=# and --stop-position=# to specify the start and stop positions respectively. The default values for --start-position is 4 and for --stop-position is 18446744073709551615
Second, we can use --start-datetime=# and --stop-datetime=# to specify the boundaries. The format of the datetime can be any accepted MySQL format.
I will be using the --start-position=# and --stop-position=#.
After adding this to our script, we get:
If you specify too low offset you may not get any output.
(some stats related to my system for reference:) For my system, setting the offset to 1MB
To be continued...
Last year at the MySQL camp, I heard about Paul Tuckfield's script that pre-fetches relay logs to speed up replication. Since then I got really interested in implementing it but never got the time. This year at MySQL conference Paul's script got a lot of attention again. Since it hasn't been released and I really need to start testing this on my test server. So I started hacking on creating a shell script to dig deeper into what's involved. Once I have that I may work on porting it to other languages.
To make the process of writing this script easier for others in their favorite languages I thought I will go through what's involved in creating this script on my blog. That way when you would like to write an open-source :) port of this script, you won't have to dig through everything. I will, of course, love to get feedback specially since I know so many people are interested in it.
Paul's keynote was among the best keynotes of MySQL conference. It was so popular that even after the keynote finished, people didn't stop picking Paul's mind. The "always-looking-out-for-the-community", Jay Pipes quickly offered , I must mention that Paul was very generous in answering many questions at both the MySQL Camp and MySQL Conference and Expo.
So the concept is something like this (unless otherwise specified, I will be talking about MySQL slave and not the master since we want to speed up the slave):
- Get the current position from where the slave is currently reading binlogs. This will give us the position we need to pass to mysqlbinlog program.
- If the slave isn't replicating all databases from the master then we need to filter those databases out when reading binlog output.
- Decide the maximum amount of data we would request mysqlbinlog to read at a time. Depending on the options passed to mysqlbinlog we can request whether the reading should stop at the end of current log file or should it continue till the end.
- As we get output from mysqlbinlog, we will need to extract the UPDATE statements.
- Once the UPDATE statements have been extracted we need to get the information contained in the WHERE clause and create a SELECT statement from it.
- These SELECT statements can then be played in advance to help speed up the UPDATE processes.
One thing to note is that if you use UPDATE LOW PRIORITY ... on your master then beware that it can further increase the slave lag.
One question I have in mind is whether a slave with query cache turned off will be able to realize the same performance benefits as a slave that has query cache turned on.
Another thing I am working on determining is some kind of formula that will help optimize how much data in advance should be read. This will all become reality soon.
Finally, I would like to measure key performance indicators before and after implementing this script. Ideas are certainly welcome regarding this.
If you have had a chance to play with mysqlbinlog you probably already know that most of the work is already done, thanks to the wealth of options that are available.
Of course, not everyone who will read this blog post will know about mysqlbinlog. So, I am going to give a brief introduction.
Moving relay logs to a test environment
To start playing with mysqlbinlog command, move some relay logs to your test machine.
Say hello to mysqlbinlog
Imagine if we would have had to read the binlogs ourself. Suddenly this whole script would become very challenging for some. Luckily we don't have to do that. Within the bin directory of your MySQL installation there are several helpful programs (or utilities) that you can use to ease your everyday life as in this case.
To view the mysqlbinlog options, run it without any option. I am going to touch on some of these options below.
First, let's start with invoking mysqlbinlog with the name of a relay log file that we are interested in reading.
slave:/path/] /path/to/mysqlbinlog slave-relay-bin.000169 | more
Typical output of the above will be something similar to the following:
/*!40019 SET @@session.max_insert_delayed_threads=0*/;
# at 4
#070329 18:11:33 server id 1  log_pos 915813658         Query   thread_id=345365808     exec_time=0     error_code=0
use db;
SET TIMESTAMP=1175206293;
REPLACE INTO ...;
# at 207
#070329 18:11:33 server id 1  log_pos 915813861         Query   thread_id=345007376     exec_time=0     error_code=0
use mysql_rocks;
SET TIMESTAMP=1175206293;
UPDATE world set db='MySQL';
Let's de-construct this line by line:
# at 4
This means that the following statement is at delimiter position 4.
#070329 18:11:33 server id 1 log_pos 915813658 Query thread_id=345365808 exec_time=0 error_code=0
First, we can see the date and time followed by server id to which the statement originally belonged.
The number following log_pos corresponds to the position of this relay log record in the original binlog.
Next is the type of statement, the thread id that caused this statement to be inserted. It seems like the next is probably time it took to execute the query and the error code generated when the query was executed..
use mysql_rocks;
SET TIMESTAMP=1175206293;
UPDATE world set db='MySQL';
The remaining lines are pretty self explanatory and contain the database name, original timestamp and the actual query.
As you can see there is a bunch of output that, while helpful, won't be needed for the purpose of creating this script. We can use the -s or --short-form option to obtain just the queries. Try it out:
slave:/path/] /path/to/mysqlbinlog -s slave-relay-bin.000169 | more
Most of my slaves are not exact replicas of the master and do not "replicate" all databases. Some databases present on the master are ignored. Generally, when this is the case you would be using the --binlog-ignore-db=db_being_ignored on your master to ignore statements that belong to db_being_ignored don't make it to the binlog. But let's assume that for some reason your relay logs contain statements belonging to databases that aren't being replicated and should be ignored for the purpose of this script. If these statements aren't filtered out, you will end up issuing SELECTs that cannot be executed due to missing database and tables.
To get the queries for a specific database only we could use an external utility such as grep or sed, but not use -d or --database=name option and let mysqlbinlog do the job for us. In these posts I am going to just focus on creating this script for a single database. Later, if time permits, I will work on multiple databases. Our "script-in-progress" now becomes:
slave:/path/] /path/to/mysqlbinlog -s -d db_to_filter_for slave-relay-bin.000169 | more
This will make mysqlbinlog output only entries that belong to db_being_ignored.
Unfortunately, I couldn't find any built-in filter to filter out UPDATE statements, therefore I am going to resort to some external utility like grep. Actually, let's use sed :)
/path/to/mysqlbinlog -s -d db_to_filter_for slave-relay-bin.000169 | sed -e '/UPDATE.*SET.*WHERE/b' -e d | more
The -e option specifies that we will be issuing edit command. As you can see multiple -e options can be specified. The /b flag is used for specifying patterns we want to keep and d to delete the pattern space.
I couldn't find the case-insensitive option for sed on Solaris 10 so let's try this (I'll improve it later):
mysqlbinlog -s -d db_to_filter_for slave-relay-bin.000169 | sed -e '/UPDATE.*SET.*WHERE/b' -e '/update.*set.*where/b' -e d | more
Now let's bite the bullet and convert the UPDATE statements to SELECT statements.
mysqlbinlog -s -d db_to_filter_for slave-relay-bin.000169 | sed -e '/UPDATE.*SET.*WHERE/b' -e '/update.*set.*where/b' -e d | sed -e 's/LOW_PRIORITY//' | sed -e 's/UPDATE\(.*\)SET\(.*\)WHERE\(.*\)/SELECT \* FROM\1 WHERE \3/g' | sed -e 's/update\(.*\) set \(.*\)where\(.*\)/SELECT \* FROM\1 WHERE \3/g'
OMG!, this is looking pretty good :)
Before we go any further, let's specify exactly how much of relay binlog should be read.
We have at least two options as far the decision of where to start and stop.
First, we can specify --start-position=# and --stop-position=# to specify the start and stop positions respectively. The default values for --start-position is 4 and for --stop-position is 18446744073709551615
Second, we can use --start-datetime=# and --stop-datetime=# to specify the boundaries. The format of the datetime can be any accepted MySQL format.
I will be using the --start-position=# and --stop-position=#.
After adding this to our script, we get:
start_pos=4; offset=` expr 1024 '*' 1024 `; stop_pos=`expr $start_pos + $offset`; /path/to/mysqlbinlog -s -d db_to_filter_for --start-position=$start_pos --stop-position=$stop_pos slave-relay-bin.000169 | sed -e '/UPDATE.*SET.*WHERE/b' -e '/update.*set.*where/b' -e d | sed -e 's/LOW_PRIORITY//' | sed -e 's/UPDATE\(.*\)SET\(.*\)WHERE\(.*\)/SELECT \* FROM\1 WHERE \3/g' | sed -e 's/update\(.*\) set \(.*\)where\(.*\)/SELECT \* FROM\1 WHERE \3/g'
If you specify too low offset you may not get any output.
(some stats related to my system for reference:) For my system, setting the offset to 1MB
offset=` expr 1024 '*' 1024 `;on average produced 927 SELECTs. Without any options specified, the total output was 26314 lines (not queries). On average the relay log contained 26075379 lines. The last position in relay logs on average was 1073741494. From every relay log file I was able to produce on average 1049323 SELECT statements. On an idle server, producing the SELECT statements after parsing 100MB of relay binlog took 12 seconds and about one second for processing 10MB.
To be continued...
Thursday, May 10, 2007
Tuesday, May 08, 2007
DTrace and MySQL - 1
With this post, I am starting another series of blog posts that will help you become familiar of DTrace. You can then apply that knowledge to find all the hidden performance goodies of MySQL on Solaris 10. Sounds good?
DTrace is one of those tools that the more you use it, the more you fall in love with it. To be fair, it is much more than a tool, in fact it has its own language, D.
With DTrace you can enable probes by either their name or their number. To see a list of probes available, run
To enable a basic probe named BEGIN with the id of 1, we can either use:
In addition, to enabling individual probes, we can also enable multiple probes simply be specifying them on the command line. For instance:
or
If you try to enable a probe that is not valid, you will get an error like this:
For a complete and in-depth coverage of DTrace, make sure you check out Solaris Dynamic Tracing Guide. For those looking to dive into examples right away, checkout the /usr/demo/dtrace directory on your Solaris machine.
to be continued...
DTrace is one of those tools that the more you use it, the more you fall in love with it. To be fair, it is much more than a tool, in fact it has its own language, D.
With DTrace you can enable probes by either their name or their number. To see a list of probes available, run
[root@db31:/] dtrace -l | more.
ID PROVIDER MODULE FUNCTION NAME
1 dtrace BEGIN
2 dtrace END
3 dtrace ERROR
4 syscall nosys entry
5 syscall nosys return
6 syscall rexit entry
7 syscall rexit return
8 syscall forkall entry
9 syscall forkall return
10 syscall read entry
11 syscall read return
12 syscall write entry
13 syscall write return
14 syscall open entry
15 syscall open return
16 syscall close entry
17 syscall close return
18 syscall wait entry
19 syscall wait return
20 syscall creat entry
21 syscall creat return
...
To enable a basic probe named BEGIN with the id of 1, we can either use:
or
[root@db31:/] dtrace -n BEGIN
dtrace: description 'BEGIN' matched 1 probe
CPU     ID                    FUNCTION:NAME
  1      1                           :BEGIN
^C
[root@db31:/] dtrace -i 1
dtrace: description '1' matched 1 probe
CPU     ID                    FUNCTION:NAME
  0      1                           :BEGIN
^C
In addition, to enabling individual probes, we can also enable multiple probes simply be specifying them on the command line. For instance:
[root@db31:/] dtrace -i 1 -i 2 -i 3
dtrace: description '1' matched 1 probe
dtrace: description '2' matched 1 probe
dtrace: description '3' matched 1 probe
CPU     ID                    FUNCTION:NAME
  0      1                           :BEGIN
^C
  0      2                             :END
or
[root@db31:/] dtrace -n BEGIN -n END -n ERROR
dtrace: description 'BEGIN' matched 1 probe
dtrace: description 'END' matched 1 probe
dtrace: description 'ERROR' matched 1 probe
CPU     ID                    FUNCTION:NAME
  1      1                           :BEGIN
^C
  0      2                             :END
If you try to enable a probe that is not valid, you will get an error like this:
[root@db31:/] dtrace -n BEGIN -n END -n ERRORS
dtrace: invalid probe specifier ERRORS: probe description :::ERRORS does not match any probes
For a complete and in-depth coverage of DTrace, make sure you check out Solaris Dynamic Tracing Guide. For those looking to dive into examples right away, checkout the /usr/demo/dtrace directory on your Solaris machine.
to be continued...
Monday, May 07, 2007
MySQL conference ending thoughts and presentation files
Man, I can't believe it's been over a week since I returned from the very great and exciting MySQL conference 2007. I got to meet all my old and new friends. Big Kudos to Jay Pipes and all MySQL'ers who helped make this event possible.
To me, this year's conference was the best ever. Partly because I made the very wise decision of staying at Hyatt so I won't miss a lot. At conferences like these the more you mingle with people, the more you get out of it. I had some amazing conversations with Mark Atwood, Brian Aker, Jay Pipes (I will never forget :)), Jeremy Cole, Eric Bergen, Pascal (Yahoo! France), Beat Vontobel, Markus Popp, Boel (MySQL HR), Christine Fortier, Marc Simony, Govi (Amazon), the "R"s of MySQL (Ronald and Ronald), Sheeri Kritzer, Carsten (certification), Ken Jacobs (Oracle), Kaj Arno, Dean (MySQL Support head), Domas, Kerry Ancheta (MySQL sales guru :)), Baron, Paul Tuckfield, Don MacAskill, Tobias, Peter Zaitsev, Chip Turner, Mark Callaghan and many more cool people. Thank you, everyone.
The sad part is that there wasn't enough time for me to hang out with people as much as I wanted. Oh well, MySQL Camp II is just around the corner in NYC.
I would also never forget the night I went to Denny's and had a Jalapeno burger with Michelle (wife), Jeremy, Adrienne (Mrs. Cole), Liam, Eric, Ronald, Domas and Pascal. It was so much fun.
At the conference, I also got a chance to be a part of MySQL Certification Technical Advisory Board (thanks to Carsten and Roland for having me). There were some excellent ideas and important issues discussed there. Everyone, including Mike Kruckenberg, Collins Charles and Sheeri contributed some excellent suggestions.
The presentation files for my sessions are now available at http://www.mysqlconf.com. Thank you to all those who written me repeatedly and kept reminding me about putting the slides online. I really appreciate your patience. The slides do not make up for the talk so if you find yourself with a question, please feel free to shoot an email. You can find my email address in the header of my blog.
Also, big thanks to Warren Habib, my boss, who was there to provide his support.
- MySQL and Lucene
- Fotolog: Scaling the world's largest photo blogging community (We have now crossed 100 million page views a day and are ranked as the 24th most visited site on the Internet by Alexa.)
For all those who have sent me an email, please bear with me as I will be sending a personal reply to everyone.
Can you trust your backups?
It is a good practice to check the integrity of your backups from time to time. You don't want something like this happening to you :)
time gunzip  -f -v entrieva/db4/guestbook_M-070507.tar.gz
entrieva/db4/guestbook_M-070507.tar.gz:
gunzip: entrieva/db4/guestbook_M-070507.tar.gz: unexpected end of file

real    67m56.782s
user    48m40.006s
sys     14m14.584s
Solaris 10 Dual Boot Installation on a Laptop
Earlier, I blogged about how to install Solaris 10 on Mac book using Parallels. This post contains links to screen casts about installing Open Solaris on a laptop as dual boot.
For information on installing Solaris 10 as a virtual machine on Mac Book, see my earlier posts:
- Introduction
- Backing up disk
- Partitioning the disk
- Solaris Express Developer edition installation
- Installing Sun Studio 11
For information on installing Solaris 10 as a virtual machine on Mac Book, see my earlier posts:
Installing MySQL on Solaris 10 Virtual Machine: gcc and cc Compiler Option Differences
I left the last post in this series at the point of running make for the bitkeeper client. If you have been following the posts and tried to do that, you will be greeted with the following errors:
The first line shows the compiler options being used followed by a warning and an error. The reason we are getting this error is because cc options != gcc options. We have two solutions at hand at this point:
1. Use gcc (we installed it earlier)
2. Change the compiler options to use cc's compiler options instead of gcc.
Using gcc compiler
To use the gcc compiler instead of cc, do the following:
This will let you go past the first set of errors. make will now be stopping with the following errors.
These errors mean that you need to set LDFLAGS as follows
Now running make should produce no errors.
Using the cc compiler flags
To change the gcc compiler flags to cc compiler flags, edit the Makefile and replace the line that specifies the gcc options with a line using options recognized by cc. So, you would find the line:
and replace with
Regarding -Wno-parentheses, James Carlson of Sun Microsystems pointed out the following:
Now running make will produce
To get rid of the undefined symbols, you would need to link the right libraries.
Al Hopper of Logical Approach Inc, once gave me a very handy tip to find more about the "mysterious" undefined symbol. He suggested using something like (run for both /lib and /usr/lib):
which produces:
This will tell us that we need the "-lnsl". Similarly running a slightly modified version of the above, we can find out that we also need "-lsocket" specified in LDFLAGS.
The approach I mention above is a bit controversial so use it only if you know the issues it could drag you into. There are other ways to get the same information such as "man socket" and "man gethostbyname" that will do the job in most cases.
At this point, you should be able to run make without any issues.
to be continued.
bash-3.00# make
cc -O2 -Wall -Wno-parentheses    bkf.c   -o bkf
cc: Warning: option -2 passed to ld
cc: illegal option -Wall
make: *** [bkf] Error 1
The first line shows the compiler options being used followed by a warning and an error. The reason we are getting this error is because cc options != gcc options. We have two solutions at hand at this point:
1. Use gcc (we installed it earlier)
2. Change the compiler options to use cc's compiler options instead of gcc.
Using gcc compiler
To use the gcc compiler instead of cc, do the following:
bash-3.00# CC=`which gcc`
bash-3.00# export CC
bash-3.00# make
This will let you go past the first set of errors. make will now be stopping with the following errors.
bash-3.00# make
/usr/local/bin/gcc -O2 -Wall -Wno-parentheses    bkf.c   -o bkf
Undefined                       first referenced
symbol                             in file
gethostbyname                       /var/tmp//ccGSplTt.o
socket                              /var/tmp//ccGSplTt.o
connect                             /var/tmp//ccGSplTt.o
ld: fatal: Symbol referencing errors. No output written to bkf
collect2: ld returned 1 exit status
make: *** [bkf] Error 1
These errors mean that you need to set LDFLAGS as follows
export LDFLAGS="-lsocket -lnsl -lm"
Now running make should produce no errors.
bash-3.00# make
/usr/local/bin/gcc -O2 -Wall -Wno-parentheses  -lsocket -lnsl -lm  bkf.c   -o bkf
Using the cc compiler flags
To change the gcc compiler flags to cc compiler flags, edit the Makefile and replace the line that specifies the gcc options with a line using options recognized by cc. So, you would find the line:
CFLAGS=-O2 -Wall -Wno-parentheses
and replace with
CFLAGS=-xO2 -v
Regarding -Wno-parentheses, James Carlson of Sun Microsystems pointed out the following:
Gcc does have it documented in the 'info' files; you just have to look
under "-Wparenthesis" in the warning options.

For the equivalent outside of gcc, see lint's "-errchk=no%parenthesis"
option.  (Our tool chain doesn't get lint and cc confused.  ;-})
Now running make will produce
bash-3.00# make
cc -xO2 -v    bkf.c   -o bkf
"bkf.c", line 196: warning: Function has no return statement : clone
Undefined                       first referenced
symbol                             in file
gethostbyname                       bkf.o
socket                              bkf.o
connect                             bkf.o
ld: fatal: Symbol referencing errors. No output written to bkf
make: *** [bkf] Error 1
To get rid of the undefined symbols, you would need to link the right libraries.
Al Hopper of Logical Approach Inc, once gave me a very handy tip to find more about the "mysterious" undefined symbol. He suggested using something like (run for both /lib and /usr/lib):
for i in /lib/*.so
do
 /usr/ccs/bin/nm -Ag $i |grep -v UNDEF |grep gethostbyname
done
which produces:
/lib/libnsl.so: [2643]  |    110640|      89|FUNC |GLOB |0    |11     |gethostbyname
/lib/libnsl.so: [2683]  |    110202|     222|FUNC |GLOB |0    |11     |gethostbyname_r
/lib/libnsl.so: [3113]  |    128448|     174|FUNC |GLOB |0    |11     |_switch_gethostbyname_r
/lib/libnsl.so: [2841]  |    110108|      44|FUNC |GLOB |0    |11     |_uncached_gethostbyname_r
/lib/libresolv.so: [1585]       |     78996|      38|FUNC |GLOB |0    |11     |res_gethostbyname
/lib/libresolv.so: [1397]       |     79034|      41|FUNC |GLOB |0    |11     |res_gethostbyname2
/lib/libxnet.so: [79]   |         0|       0|FUNC |GLOB |0    |ABS    |gethostbyname
This will tell us that we need the "-lnsl". Similarly running a slightly modified version of the above, we can find out that we also need "-lsocket" specified in LDFLAGS.
The approach I mention above is a bit controversial so use it only if you know the issues it could drag you into. There are other ways to get the same information such as "man socket" and "man gethostbyname" that will do the job in most cases.
export LDFLAGS="-lsocket -lnsl -lm"
At this point, you should be able to run make without any issues.
bash-3.00# make
cc -lsocket -lnsl -lm  bkf.o   -o bkf
to be continued.
Migration of database with special characters
Michael Chu has posted a review of how to migrate MySQL database with special characters properly.
Sunday, May 06, 2007
Installing MySQL on Solaris 10 Virtual Machine: Other tools
Before we can install MySQL using bitkeeper, we need certain tools to be installed.
Download Bitkeeper Client
From Sunfreeware.com
- Install wget-1.10.2-sol10-x86-local .
- Install gcc-3.4.6-sol10-x86-local or libgcc-3.4.6-sol10-x86-local.gz
- Install libiconv-1.11-sol10-x86-local (required for gcc)
- Install openssl-0.9.8e-sol10-x86-local (required for wget)
- Install make-3.81-sol10-x86-local (required for bk-client)
After downloading the above packages, navigate to the directory and then run
Now you can install the packages one by one.
At this point, if running wget gives you "command not found", then make sure you have added /usr/local/bin to your PATH. The documentation will be installed in /usr/local/doc.
Now we can install bitkeeper client.
to be continued...
Download Bitkeeper Client
From Sunfreeware.com
- Install wget-1.10.2-sol10-x86-local .
- Install gcc-3.4.6-sol10-x86-local or libgcc-3.4.6-sol10-x86-local.gz
- Install libiconv-1.11-sol10-x86-local (required for gcc)
- Install openssl-0.9.8e-sol10-x86-local (required for wget)
- Install make-3.81-sol10-x86-local (required for bk-client)
After downloading the above packages, navigate to the directory and then run
gunzip *.gz
Now you can install the packages one by one.
pkgadd -d libiconv-1.11-sol10-x86-local
# this will install SMCliconv
pkgadd -d gcc-3.4.6-sol10-x86-local
# installs SMCgcc
pkgadd -d openssl-0.9.8e-sol10-x86-local
# installs SMCossl
pkgadd -d wget-1.10.2-sol10-x86-local
# installs SMCwget
pkgadd -d make-3.81-sol10-x86-local
# installs SMCmake
At this point, if running wget gives you "command not found", then make sure you have added /usr/local/bin to your PATH. The documentation will be installed in /usr/local/doc.
Now we can install bitkeeper client.
wget http://www.bitmover.com/bk-client2.0.shar
/bin/sh bk-client2.0.shar
cd bk-client2.0
make
to be continued...
Saturday, May 05, 2007
Free Solaris 10 OS and Sun Developer Tools, or Solaris Express, Developer Edition DVD
Since I have been writing these days about working with MySQL on Solaris 10 virtual machine on Mac Book, I thought why not blog about a very cool offer by Sun. As a part of their media kit program, you can get a free Solaris 10 DVD of your choice. The choices you have are:
1. Solaris 10 Operating System and Sun Developer Tools, or
2. Solaris Express, Developer Edition for x86 systems.
With one request, you can request as many as 9999 licenses. What a great way to market your product. For those who would be interested in installing Solaris 10 for your Mac, this is a good opportunity so you can have a copy of Solaris 10 on DVD.
This is a very cool and smart move by Sun. There are certainly lessons to be learned here for other open source companies like MySQL.
One thing I am wondering about is that whether MySQL is included in the Solaris Express, Developer edition. Probably not, but that goes on to show you a golden marketing opportunity for both companies. Companies that are already using Sun hardware and Solaris 10 will be much more inclined to become paying MySQL customers if MySQL and Sun work even more together to promote and optimize MySQL on Solaris. Solaris 10 is a great operating system and MySQL, a great database. I would actually recommend that both the management of Sun and MySQL read the book "Getting to Yes: Negotiating Agreement without giving in" by Roger Fisher. It really is a great book that teaches to focus on solving issues rather than taking positions. Taking both hard and soft positions to negotiations is never helpful.
Anyway, back to the free DVDs. According to the confirmation email from Sun, you can expect to get the DVD in 2-4 weeks. The email also included some helpful links about Solaris 10, which I have included below for reference.
Solaris Learning Centers:
http://sun.com/solaris/teachmesun.com/solaris/teachme
Solaris How to Guides:
http://sun.com/solaris/howtoguidessun.com/solaris/howtoguides
Solaris Training & Learning Services
http://sun.com/training/solarissun.com/training/solaris
Solaris Services & Support
http://sun.com/solaris/get_supportsun.com/solaris/get_support
Installing MySQL on Solaris 10 Virtual Machine
Now that I am happy with my Solaris 10 virtual machine running on my Mac Book, I can proceed with installing (compiling) MySQL on it. However as you can expect, the default Solaris 10 installation doesn't install cc compiler by default. We can confirm that if the following error message is displayed when running we run cc on Solaris 10 console:
What this means is that we need to install Sun Studio 11 from Sun site. Before downloading you need to be logged in. The download file studio11-sol-x86.tar.bz2 is about 332.6MB.
Once you have it installed, check the checksum and then proceed with decompressing the Sun Studio 11 bz2 file. Note I used the very verbose and keep option. You may or may not want to use them.
Among other files, it will put an InstallGuide_Solaris.pdf file which you should read before installing. On Solaris you can use gpdf to launch the file.
One thing to note when installing Sun Studio 11 is that you will need to set your PATH environment variable. By default the PATH variable will be set as following:
Since Sun Studio 11 will be installed in /opt/SUNWspro/bin we will need to add this to the PATH variable. To set the PATH variable, put the following line in your ~/.bashrc
Once the above has been placed, you will need to "dot" the file.
Now your PATH should be setup appropriately. Similarly you will need to setup MANPATH to include /opt/SUNWspro/man.
Once the Sun Studio will be installed, we will be able to access the documentation from /opt/SUNWspro/docs/index.html.
Before continuing, we should have ample swap space defined. You can add swap space by following the procedure below. On your Solaris 10 virtual machine, make sure you don't create the new swap file at / or you may get an error relating to no more space left on device. Since I created the virtual file system at /export/home through Parallels, I have prefixed my swap file location with /export/home.
When I tried to specify the new swap space, I got the following error. This is related to me setting a small swap size using Parallels. To correct this, I will need to set swap space higher through Parallels and then try again.
I tried again with 900M swap and it worked fine.
Now we can either run the installer in GUI or command-line mode. I haven't yet used the GUI installer to install Sun Studio 11 so I am going to do that just out of curiosity.
To launch the GUI installer, navigate to where you decompressed the Sunstudio11 files and run
To launch in command line mode:
Once the installer launches, click next to go to and accept the agreement. On the next screen make sure only English is selected. Keep the default selections selected for installation.
For the Sun Studio 11 software install directory, make sure it is /opt or you may need to modify your PATH and MANPATH variables accordingly.
Next you can review the installation and once you confirm the installation will begin.
Once the installation is complete, you will be able to see the log files created during install at
Some interesting information is available in /opt/SUNWspro/READMEs/email_template.txt.
At this point you should be able to run the IDE by executing
You should check to make sure that which cc doesn't return /usr/ucb/cc. If it does then do the following:
I will continue in the next post.
bash-3.00# cc
/usr/ucb/cc: language optional software package not installed
What this means is that we need to install Sun Studio 11 from Sun site. Before downloading you need to be logged in. The download file studio11-sol-x86.tar.bz2 is about 332.6MB.
Once you have it installed, check the checksum and then proceed with decompressing the Sun Studio 11 bz2 file. Note I used the very verbose and keep option. You may or may not want to use them.
bzip2 -d -v -v -k studio11-sol-x86.tar.bz2
time tar -xvf studio11-sol-x86.tar > studio11-install.log
# 4m53s
Among other files, it will put an InstallGuide_Solaris.pdf file which you should read before installing. On Solaris you can use gpdf to launch the file.
One thing to note when installing Sun Studio 11 is that you will need to set your PATH environment variable. By default the PATH variable will be set as following:
echo $PATH
/usr/sbin:/usr/bin:/usr/dt/bin:/usr/openwin/bin:/usr/ucb
Since Sun Studio 11 will be installed in /opt/SUNWspro/bin we will need to add this to the PATH variable. To set the PATH variable, put the following line in your ~/.bashrc
export PATH=$PATH:/opt/SUNWspro/bin
Once the above has been placed, you will need to "dot" the file.
. ~/.bashrc
Now your PATH should be setup appropriately. Similarly you will need to setup MANPATH to include /opt/SUNWspro/man.
Once the Sun Studio will be installed, we will be able to access the documentation from /opt/SUNWspro/docs/index.html.
Before continuing, we should have ample swap space defined. You can add swap space by following the procedure below. On your Solaris 10 virtual machine, make sure you don't create the new swap file at / or you may get an error relating to no more space left on device. Since I created the virtual file system at /export/home through Parallels, I have prefixed my swap file location with /export/home.
mkdir /export/home/swap
mkfile 2048m /export/home/swap/2gswap
ls -l /export/home/swap/2gswap
When I tried to specify the new swap space, I got the following error. This is related to me setting a small swap size using Parallels. To correct this, I will need to set swap space higher through Parallels and then try again.
swap -a /export/home/swap/2gswap
# size is invalid
I tried again with 900M swap and it worked fine.
Now we can either run the installer in GUI or command-line mode. I haven't yet used the GUI installer to install Sun Studio 11 so I am going to do that just out of curiosity.
To launch the GUI installer, navigate to where you decompressed the Sunstudio11 files and run
./installer
To launch in command line mode:
./installer -nodisplay
Once the installer launches, click next to go to and accept the agreement. On the next screen make sure only English is selected. Keep the default selections selected for installation.
For the Sun Studio 11 software install directory, make sure it is /opt or you may need to modify your PATH and MANPATH variables accordingly.
Next you can review the installation and once you confirm the installation will begin.
Once the installation is complete, you will be able to see the log files created during install at
cd /var/sadm/install/logs
Some interesting information is available in /opt/SUNWspro/READMEs/email_template.txt.
At this point you should be able to run the IDE by executing
sunstudio.
You should check to make sure that which cc doesn't return /usr/ucb/cc. If it does then do the following:
cd /usr/ucb
rm cc
ln -s /opt/SUNWspro/bin/cc cc
I will continue in the next post.
Installing Solaris 10 on Mac Book using Parallels (5): Installing RTL8029
Solaris 10 currently does not support the RTL8029 network driver to be emulated in virtual machines. In order for us to have RTL8029 support on a Solaris 10 virtual machine, we must install the RTL8029 network adapter driver. This driver can be configured manually or by running the network.sh script. When Solaris 10 virtual machine is running, we need to connect vmtools.iso to the CD/DVD ROM drive of Solaris 10 machine. To do this, go to Devices / CD/DVD ROM / Connect Image.
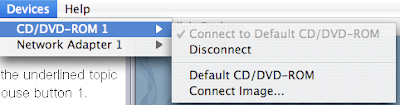
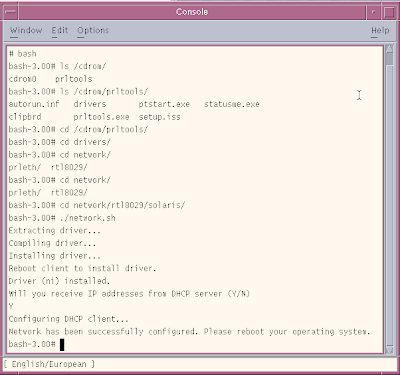
Now browse to Library / Parallels / Tools / vmtools.iso and click open. Then browse to /cdrom/prltools/drivers/network/solaris and run network.sh.
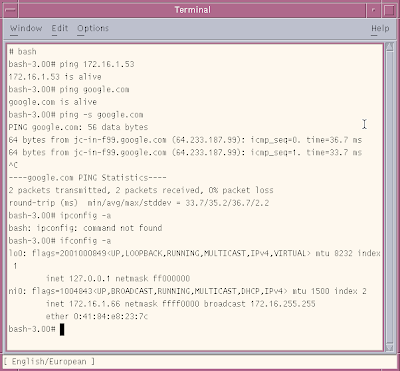
At this point, you should be able to ping your favorite website and confirm that you have been assigned an IP address.
NEXT:
Installing Solaris 10 on Mac Book: part 1
Installing Solaris 10 on Mac Book using Parallels: part 2
Installing Solaris 10 on Mac Book using Parallels: part 3
Installing Solaris 10 on Mac Book using Parallels: part 4
Installing Solaris 10 on Mac Book using Parallels: part 5

Now browse to Library / Parallels / Tools / vmtools.iso and click open. Then browse to /cdrom/prltools/drivers/network/solaris and run network.sh.

At this point, you should be able to ping your favorite website and confirm that you have been assigned an IP address.

NEXT:
Installing Solaris 10 on Mac Book: part 1
Installing Solaris 10 on Mac Book using Parallels: part 2
Installing Solaris 10 on Mac Book using Parallels: part 3
Installing Solaris 10 on Mac Book using Parallels: part 4
Installing Solaris 10 on Mac Book using Parallels: part 5
Installing Solaris 10 on Mac Book using Parallels (4)
Ok, so after the installation ended I got the dreaded "Solaris 10" Software Installation partially failed.

The detailed error messages were located in /tmp/install. Most errors were related to unallocated space in UFS something that may be explainable by the fact that it is an expanding file system and for a virtual machine. However most installations were successful so I decided to ignore the errors for now (after logging) and proceed.

Next was the confirmation screen for additional software which had installed successfully.

At this point you should be seeing a reboot screen like the one displayed below

Upon reboot, there were some errors related to scratch registers. I will investigate them later but for now, let's continue. These errors relate to the fact that we are running as a virtual machine.

At this point the virtual machine froze for a long time so I decided to stop and start the execution again. This time I got the "All devices are configured" message followed by a question about whether I would like to overwrite the system's default NFS version 4 domain name. I answered no.

Then Solaris started in GUI mode. At this point I can finally login.

When you login for the very first time, you will be presented with the option of choosing the default desktop.
 .
.
At this point, I will like to get the networking working (:)) as that has been an issue so far. I will continue from this point on in my next post.
NEXT:
Installing Solaris 10 on Mac Book: part 1
Installing Solaris 10 on Mac Book using Parallels: part 2
Installing Solaris 10 on Mac Book using Parallels: part 3
Installing Solaris 10 on Mac Book using Parallels: part 4
Installing Solaris 10 on Mac Book using Parallels: part 5

The detailed error messages were located in /tmp/install. Most errors were related to unallocated space in UFS something that may be explainable by the fact that it is an expanding file system and for a virtual machine. However most installations were successful so I decided to ignore the errors for now (after logging) and proceed.

Next was the confirmation screen for additional software which had installed successfully.

At this point you should be seeing a reboot screen like the one displayed below

Upon reboot, there were some errors related to scratch registers. I will investigate them later but for now, let's continue. These errors relate to the fact that we are running as a virtual machine.

At this point the virtual machine froze for a long time so I decided to stop and start the execution again. This time I got the "All devices are configured" message followed by a question about whether I would like to overwrite the system's default NFS version 4 domain name. I answered no.

Then Solaris started in GUI mode. At this point I can finally login.

When you login for the very first time, you will be presented with the option of choosing the default desktop.
 .
.At this point, I will like to get the networking working (:)) as that has been an issue so far. I will continue from this point on in my next post.
NEXT:
Installing Solaris 10 on Mac Book: part 1
Installing Solaris 10 on Mac Book using Parallels: part 2
Installing Solaris 10 on Mac Book using Parallels: part 3
Installing Solaris 10 on Mac Book using Parallels: part 4
Installing Solaris 10 on Mac Book using Parallels: part 5
Installing Solaris 10 on Mac Book using Parallels (3)
This is the third part of installing Solaris 10 on Mac book as a virtual machine using Parallels.
We left off at the "Type of Install" screen for which I am going to choose Custom Install.
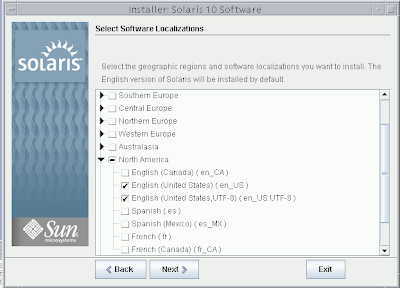
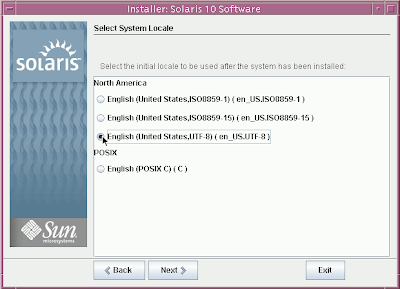
Next, choose the software localizations. If you don't choose any localization, the default English version of Solaris will be installed.
The default selection was English POSIX C (C). I chose the English US UTF-8 as the inital locale to be used after the system initializes.
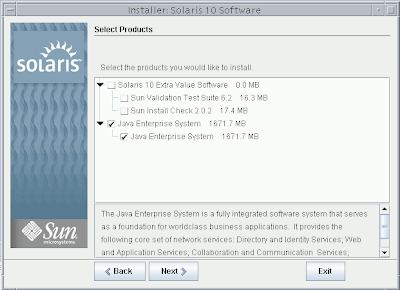
Depending on your preference, you may also want to install Java Enterprise System for development etc.
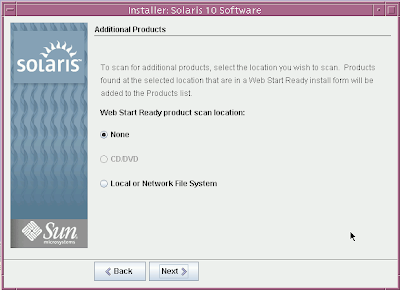
If you would like to scan for additional Solaris products and you have them on a local or network file system, you can do so in the next step.
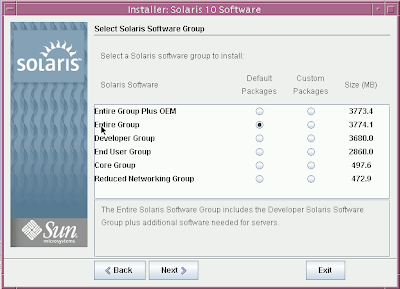
I will be installing the Entire Group. which will include the developer solaris software and additional software needed for servers.
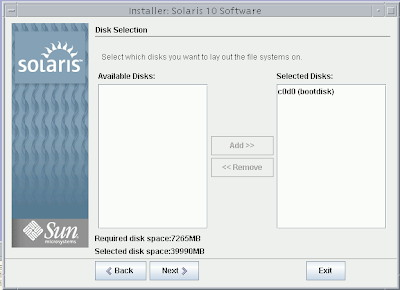
Next is the disk selection screen. The default configuration here is just fine.
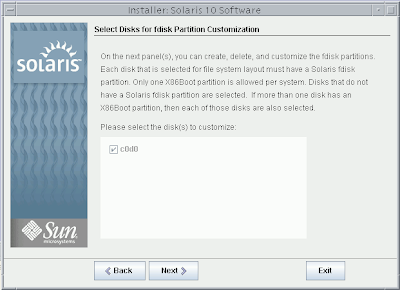
In the next screen you can select disk(s) for fdisk partitioning. Each disk selected for file system layout must have a Solaris fdisk partition. Each system can only have one X86Boot partition.
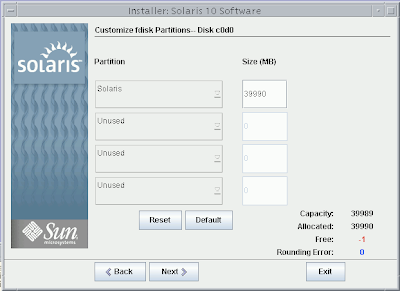
For the next screen, the default options are fine.
Now Solaris will determine size requirements based on your selections and then present information about Lay Out File Systems
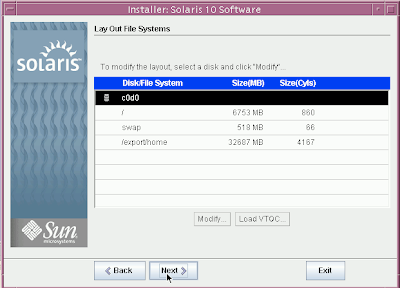
If everything looks good click next to confirm and install your selections.

Now sit back and enjoy the installation as it proceeds.

To be continued...
NEXT:
Installing Solaris 10 on Mac Book: part 1
Installing Solaris 10 on Mac Book using Parallels: part 2
Installing Solaris 10 on Mac Book using Parallels: part 3
Installing Solaris 10 on Mac Book using Parallels: part 4
Installing Solaris 10 on Mac Book using Parallels: part 5
We left off at the "Type of Install" screen for which I am going to choose Custom Install.

Next, choose the software localizations. If you don't choose any localization, the default English version of Solaris will be installed.

The default selection was English POSIX C (C). I chose the English US UTF-8 as the inital locale to be used after the system initializes.

Depending on your preference, you may also want to install Java Enterprise System for development etc.

If you would like to scan for additional Solaris products and you have them on a local or network file system, you can do so in the next step.

I will be installing the Entire Group. which will include the developer solaris software and additional software needed for servers.

Next is the disk selection screen. The default configuration here is just fine.

In the next screen you can select disk(s) for fdisk partitioning. Each disk selected for file system layout must have a Solaris fdisk partition. Each system can only have one X86Boot partition.

For the next screen, the default options are fine.

Now Solaris will determine size requirements based on your selections and then present information about Lay Out File Systems

If everything looks good click next to confirm and install your selections.

Now sit back and enjoy the installation as it proceeds.

To be continued...
NEXT:
Installing Solaris 10 on Mac Book: part 1
Installing Solaris 10 on Mac Book using Parallels: part 2
Installing Solaris 10 on Mac Book using Parallels: part 3
Installing Solaris 10 on Mac Book using Parallels: part 4
Installing Solaris 10 on Mac Book using Parallels: part 5
Installing Solaris 10 on Mac Book using Parallels (2)
In my last post, I started a guide to install SOlaris 10 as a virtual machine on Mac book using Parallels. This is a continuation of that post.
After clicking finish, I was presented with the following screen for a moment:
Then it started to make an attempt to boot, however since the DVD wasn't ready, the boot failed.
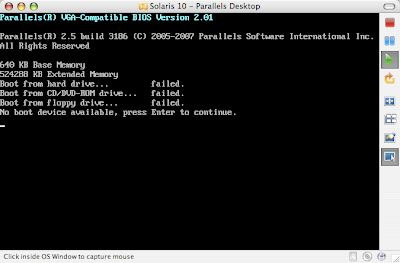
Before I know it, I was seeing the message presented in the following screen shot:
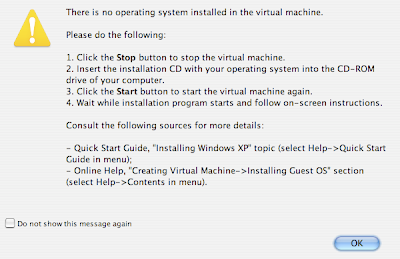
Don't worry if you see a similar message. All you gotta do is stop the virtual machine, make sure the Solaris 10 DVD is inserted and then click on the start button to start the virtual machine installation once again.
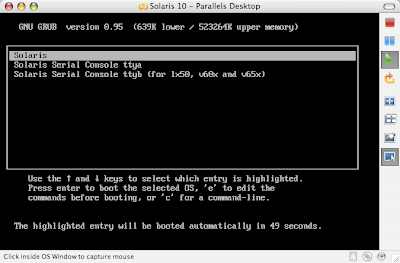
Soon you will be presented with the following options. Just make sure you select Solaris and hit Enter. If you still get errors about not being able to mount DVD ROM, just try again :)
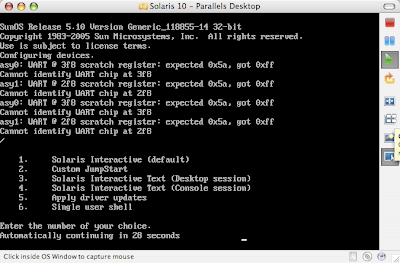
Next, choose the type of installation. I chose Solaris Interactive.
At this point, you will see messages regarding
If you experience that you are stuck at "Searching for configuration file(s)" for a very long time, try stopping and restarting virtual machine installation.
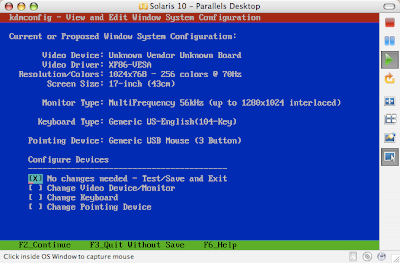
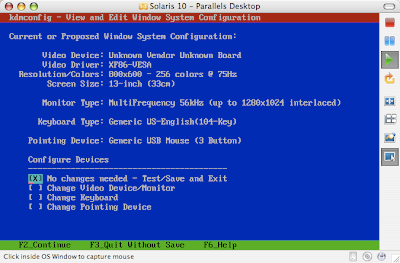
Next you will be presented with "Proposed Window System Configuration for Installation"

I wanted to decrease the resolution as with the default resolution in my earlier installation attempts, I wasn't able to run Solaris 10 in full screen mode. If you press ESC, you can change the defaults using kdmconfig.
Keep going through the screens by pressing [fn + F2] until you get to the kdmconfig screen that asks you to specify screen size selection. I chose 13-inch since I have a 13-inch Mac book. The default selected for me was 17-inch.
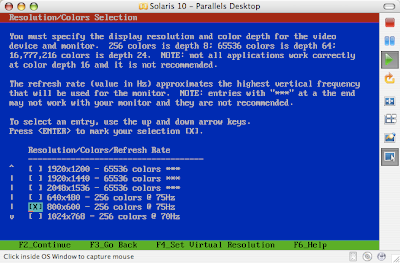
Clicking next will bring you to "Resolution/Colors Selection." Based on the issues I had with earlier installs, this is what I was looking for. The default selection was 1024x768-256 colors @70 Hz.

I chose 800x600 - 256 colors at 75Hz.
My final configuration looked something like:
Next, we are ready to now run the kdmconfig Window System Configuration test.
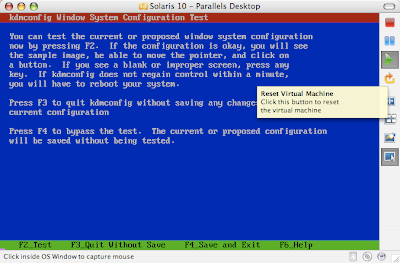
Run the test by pressing F2 (fn+F2) and you should see something like the following:
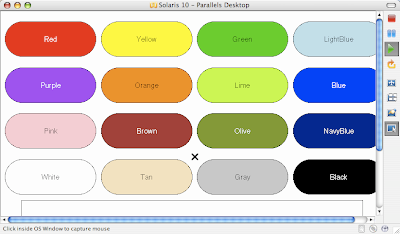
Seeing the test results, I went back and changed from 256 colors to 65536 colors. After running the test successfully for the new resolution, I was presented with the language choice screen.

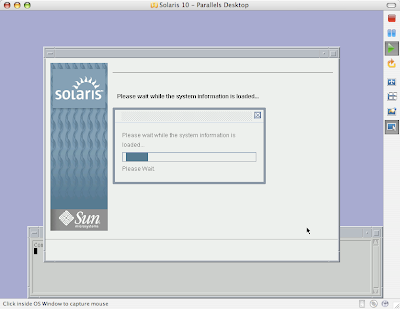
Once you select the language, you will see the following screen for some time.
Now we are ready to give Solaris 10 virtual machine information regarding the system.
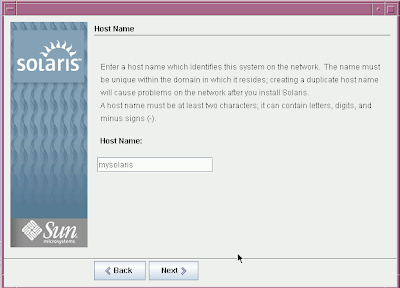
Go ahead and specify the hostname for your virtual machine.
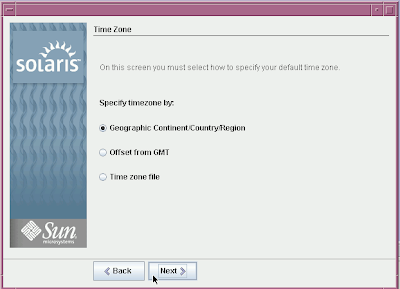
After specifying the hostname, we need to specify the time zone.
Specify the root password on the next screen:

At this point it is important to note that Solaris 10 only cares about the first 8 characters of your password. After those 8 characters you can specify whatever gibrish you want and it will authenticate successfully. I know it's very bizarre and questionable behavior of Soalris in a world where protecting sensitive information is extremely important.
Next, you will see the selection summary. Click on confirm to continue with Solaris Installation.
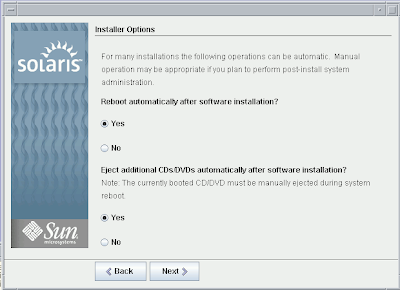
The default Installer options displayed in the next step are fine.
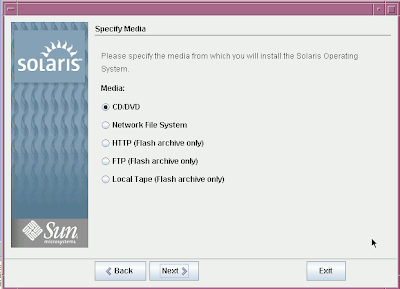
Specify the media from which you intend to install Solaris 10 Operating System. For our purpose, the default (CD/DVD) is fine.
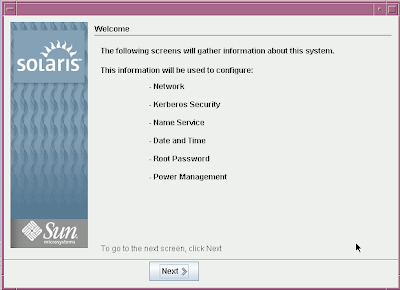
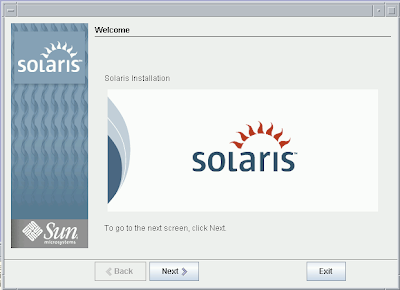
Now the system initialization begins. In a moment you will be asked to accept the agreement to continue installation.
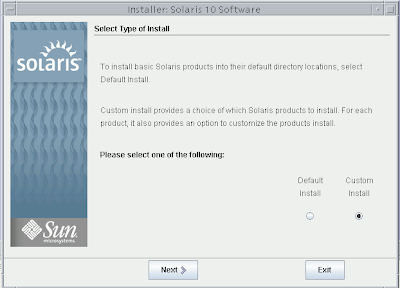
Next choose Default install if you want to install basic Solaris products and tools in their default location. I am however, going to choose Custom install.
To be continued in my next blog post.
NEXT:
Installing Solaris 10 on Mac Book: part 1
Installing Solaris 10 on Mac Book using Parallels: part 2
Installing Solaris 10 on Mac Book using Parallels: part 3
Installing Solaris 10 on Mac Book using Parallels: part 4
Installing Solaris 10 on Mac Book using Parallels: part 5
After clicking finish, I was presented with the following screen for a moment:

Then it started to make an attempt to boot, however since the DVD wasn't ready, the boot failed.

Before I know it, I was seeing the message presented in the following screen shot:

Don't worry if you see a similar message. All you gotta do is stop the virtual machine, make sure the Solaris 10 DVD is inserted and then click on the start button to start the virtual machine installation once again.
Soon you will be presented with the following options. Just make sure you select Solaris and hit Enter. If you still get errors about not being able to mount DVD ROM, just try again :)

Next, choose the type of installation. I chose Solaris Interactive.

At this point, you will see messages regarding
"Using install cd in /dev/dsk/c0t1d0p0
Using RPC Bootparams for network configuration information
Beginning System identification
Searching for configuration file(s)...
Search complete"
If you experience that you are stuck at "Searching for configuration file(s)" for a very long time, try stopping and restarting virtual machine installation.
Next you will be presented with "Proposed Window System Configuration for Installation"

I wanted to decrease the resolution as with the default resolution in my earlier installation attempts, I wasn't able to run Solaris 10 in full screen mode. If you press ESC, you can change the defaults using kdmconfig.

Keep going through the screens by pressing [fn + F2] until you get to the kdmconfig screen that asks you to specify screen size selection. I chose 13-inch since I have a 13-inch Mac book. The default selected for me was 17-inch.
Clicking next will bring you to "Resolution/Colors Selection." Based on the issues I had with earlier installs, this is what I was looking for. The default selection was 1024x768-256 colors @70 Hz.

I chose 800x600 - 256 colors at 75Hz.

My final configuration looked something like:

Next, we are ready to now run the kdmconfig Window System Configuration test.

Run the test by pressing F2 (fn+F2) and you should see something like the following:

Seeing the test results, I went back and changed from 256 colors to 65536 colors. After running the test successfully for the new resolution, I was presented with the language choice screen.

Once you select the language, you will see the following screen for some time.

Now we are ready to give Solaris 10 virtual machine information regarding the system.

Go ahead and specify the hostname for your virtual machine.

After specifying the hostname, we need to specify the time zone.

Specify the root password on the next screen:

At this point it is important to note that Solaris 10 only cares about the first 8 characters of your password. After those 8 characters you can specify whatever gibrish you want and it will authenticate successfully. I know it's very bizarre and questionable behavior of Soalris in a world where protecting sensitive information is extremely important.
Next, you will see the selection summary. Click on confirm to continue with Solaris Installation.

The default Installer options displayed in the next step are fine.

Specify the media from which you intend to install Solaris 10 Operating System. For our purpose, the default (CD/DVD) is fine.

Now the system initialization begins. In a moment you will be asked to accept the agreement to continue installation.
Next choose Default install if you want to install basic Solaris products and tools in their default location. I am however, going to choose Custom install.
To be continued in my next blog post.
NEXT:
Installing Solaris 10 on Mac Book: part 1
Installing Solaris 10 on Mac Book using Parallels: part 2
Installing Solaris 10 on Mac Book using Parallels: part 3
Installing Solaris 10 on Mac Book using Parallels: part 4
Installing Solaris 10 on Mac Book using Parallels: part 5
Installing Solaris 10 on Mac Book using Parallels
Yesterday, I got myself a Mac Book with 2GB of RAM and I am very excited about it. Earlier I created a Microsoft Windows XP virtual machine using Parallels. The whole process was a breeze. While going through Parallels documentation that it partially supports Solaris 10 as well. I had a DVD with Solaris 10 6/06 handy (which folks at Sun gave me when I visited them around two months ago in New York) so I thought why not try it out as if it works, I would have my dream machine ready. My work is 100% Solaris 10 shop as far as my professional duties are concerned. However, I didn't want to buy a Solaris 10 laptop due to lack of support available.
One cool thing about Parallels is that it lets you choose between "Shared Networking" and "Bridged Networking". Shared Networking is ideal if you don't want your virtual machine to have its own IP. This way your virtual machine will not be visible on the network.
Overall, creating virtual machine for Solaris 10 was not hard at all. However, I did run into networking issues that I couldn't solve even through command line or through smc. It turns out that in order for Solaris 10 to have networking support, you need to have Parallels networking tools installed. Since my work on this Mac Book is going to mostly revolve around MySQL, I need networking setup for Solaris. Another troubling issue I encountered was trying to run Solaris 10 in full screen mode as Solaris cannot the support the 1280x800 resolution.
Step 1: Launch Parallels for Mac
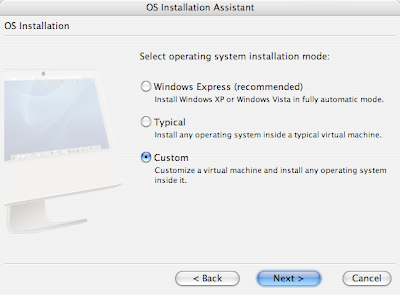
If you want to create a new Solaris 10 Virtual Machine then click "New" after launching Parallels desktop to launch OS Installation Assistant. Once the assistant launches, choose "Custom" and click next.
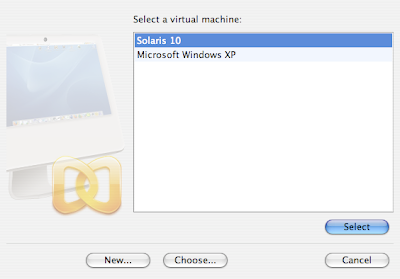
If you are wanting to reset your existing Solaris 10 Virtual machine for whatever reason, you can select the virtual machine you would like to operate on and then under the File menu, click on delete to launch an assistant program.
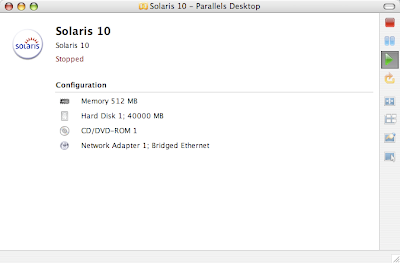
In the next step, select the OS Type as Solaris and OS Version Solaris 10 and click next.

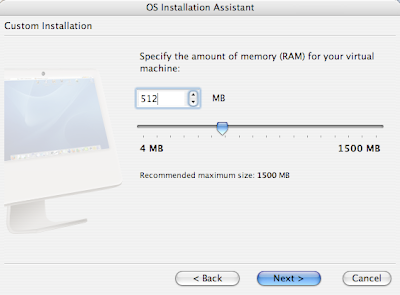
Next, you will be asked to specify the amount of RAM for your virtual machine. The default selection would be 256MB. It is highly recommended that you choose a value larger than 400MB because otherwise you will not be able to run the GUI for Solaris. Since I need to run Chime, a dtrace tool, I chose 512MB.
Once you have specified the amount of RAM to use for Solaris 10, click next to select virtual hard disk option. Since we are creating a new virtual machine, select "Create a new hard disk image."
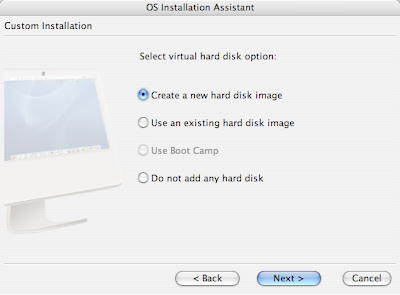
After clicking next, we need to specify the size of the virtual hard disk. It is recommended that you leave the default 32GB and select Expanding format for the virtual hard disk. If you are installing Solaris 10 with typical options, this is the format that will be selected by default.
The benefit of selecting Expanding format is that the size of the virtual hard disk will be 0 when created. The size grows up to the max specified size. Since the space is allocated on demand, you get hard drive space saving.
Clicking next will ask you to select a networking option for the Solaris 10 virtual machine. The default "Shared Networking" will let our Virtual Solaris 10 machine use Mac's network connections. Based on my earlier experiences with Solaris 10, I encourage you to select "Bridged Ethernet" which will make our Solaris 10 virtual machine appear as a separate machine on the Internet.
On the next screen keep the "Default Adapter" selected for the real network interface to be used by Solaris 10 virtual machine.
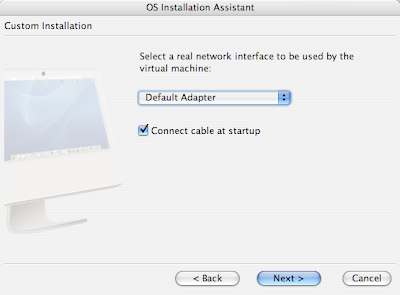
Now we are ready to name our Solaris 10 virtual machine on the next screen.
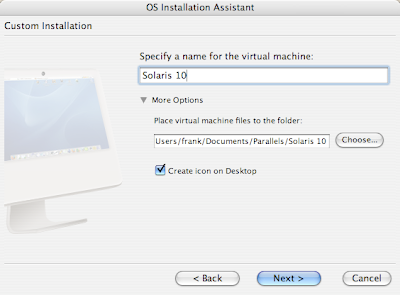
Believe it or not, we are actually ready to start the installation. Since I am installing the virtual machine using a real DVD and not from an ISO image, I kept the default options selected. Make sure you have inserted the Solaris 10 DVD/CD at this point before continuing.
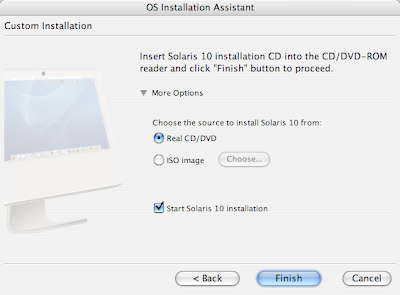
Clicking finish at this point will launch the Solaris 10 installation process. I will continue from this point in my next blog post.
NEXT:
Installing Solaris 10 on Mac Book: part 1
Installing Solaris 10 on Mac Book using Parallels: part 2
Installing Solaris 10 on Mac Book using Parallels: part 3
Installing Solaris 10 on Mac Book using Parallels: part 4
Installing Solaris 10 on Mac Book using Parallels: part 5
One cool thing about Parallels is that it lets you choose between "Shared Networking" and "Bridged Networking". Shared Networking is ideal if you don't want your virtual machine to have its own IP. This way your virtual machine will not be visible on the network.
Overall, creating virtual machine for Solaris 10 was not hard at all. However, I did run into networking issues that I couldn't solve even through command line or through smc. It turns out that in order for Solaris 10 to have networking support, you need to have Parallels networking tools installed. Since my work on this Mac Book is going to mostly revolve around MySQL, I need networking setup for Solaris. Another troubling issue I encountered was trying to run Solaris 10 in full screen mode as Solaris cannot the support the 1280x800 resolution.
Step 1: Launch Parallels for Mac
If you want to create a new Solaris 10 Virtual Machine then click "New" after launching Parallels desktop to launch OS Installation Assistant. Once the assistant launches, choose "Custom" and click next.

If you are wanting to reset your existing Solaris 10 Virtual machine for whatever reason, you can select the virtual machine you would like to operate on and then under the File menu, click on delete to launch an assistant program.

In the next step, select the OS Type as Solaris and OS Version Solaris 10 and click next.

Next, you will be asked to specify the amount of RAM for your virtual machine. The default selection would be 256MB. It is highly recommended that you choose a value larger than 400MB because otherwise you will not be able to run the GUI for Solaris. Since I need to run Chime, a dtrace tool, I chose 512MB.

Once you have specified the amount of RAM to use for Solaris 10, click next to select virtual hard disk option. Since we are creating a new virtual machine, select "Create a new hard disk image."

After clicking next, we need to specify the size of the virtual hard disk. It is recommended that you leave the default 32GB and select Expanding format for the virtual hard disk. If you are installing Solaris 10 with typical options, this is the format that will be selected by default.
The benefit of selecting Expanding format is that the size of the virtual hard disk will be 0 when created. The size grows up to the max specified size. Since the space is allocated on demand, you get hard drive space saving.
Clicking next will ask you to select a networking option for the Solaris 10 virtual machine. The default "Shared Networking" will let our Virtual Solaris 10 machine use Mac's network connections. Based on my earlier experiences with Solaris 10, I encourage you to select "Bridged Ethernet" which will make our Solaris 10 virtual machine appear as a separate machine on the Internet.
On the next screen keep the "Default Adapter" selected for the real network interface to be used by Solaris 10 virtual machine.

Now we are ready to name our Solaris 10 virtual machine on the next screen.

Believe it or not, we are actually ready to start the installation. Since I am installing the virtual machine using a real DVD and not from an ISO image, I kept the default options selected. Make sure you have inserted the Solaris 10 DVD/CD at this point before continuing.

Clicking finish at this point will launch the Solaris 10 installation process. I will continue from this point in my next blog post.
NEXT:
Installing Solaris 10 on Mac Book: part 1
Installing Solaris 10 on Mac Book using Parallels: part 2
Installing Solaris 10 on Mac Book using Parallels: part 3
Installing Solaris 10 on Mac Book using Parallels: part 4
Installing Solaris 10 on Mac Book using Parallels: part 5
Subscribe to:
Posts (Atom)